
Fill out your Chaperone Application
Five short steps in PassportsGo: about you, your address, contact, your tour and room, then review and sign.
If you're traveling as a chaperone, your Chaperone Application lives in PassportsGo: five short steps, about five minutes, and most of it is already filled in from what Passports has on file. When you sign it, you also agree to the Group Leader Terms and Conditions.
Everything must match your passport. You can submit the application only once, so check your answers before you sign.
Before you start
- PassportsGo on your phone, or passportsgo.com in a browser — signed in as yourself, the chaperone. If your group leader named you in PassportsGo, the link in your invitation email (or text) signs you in and opens your application.
- Your passport, to check your name, date of birth and sex against it.
- Step 1
Open your application
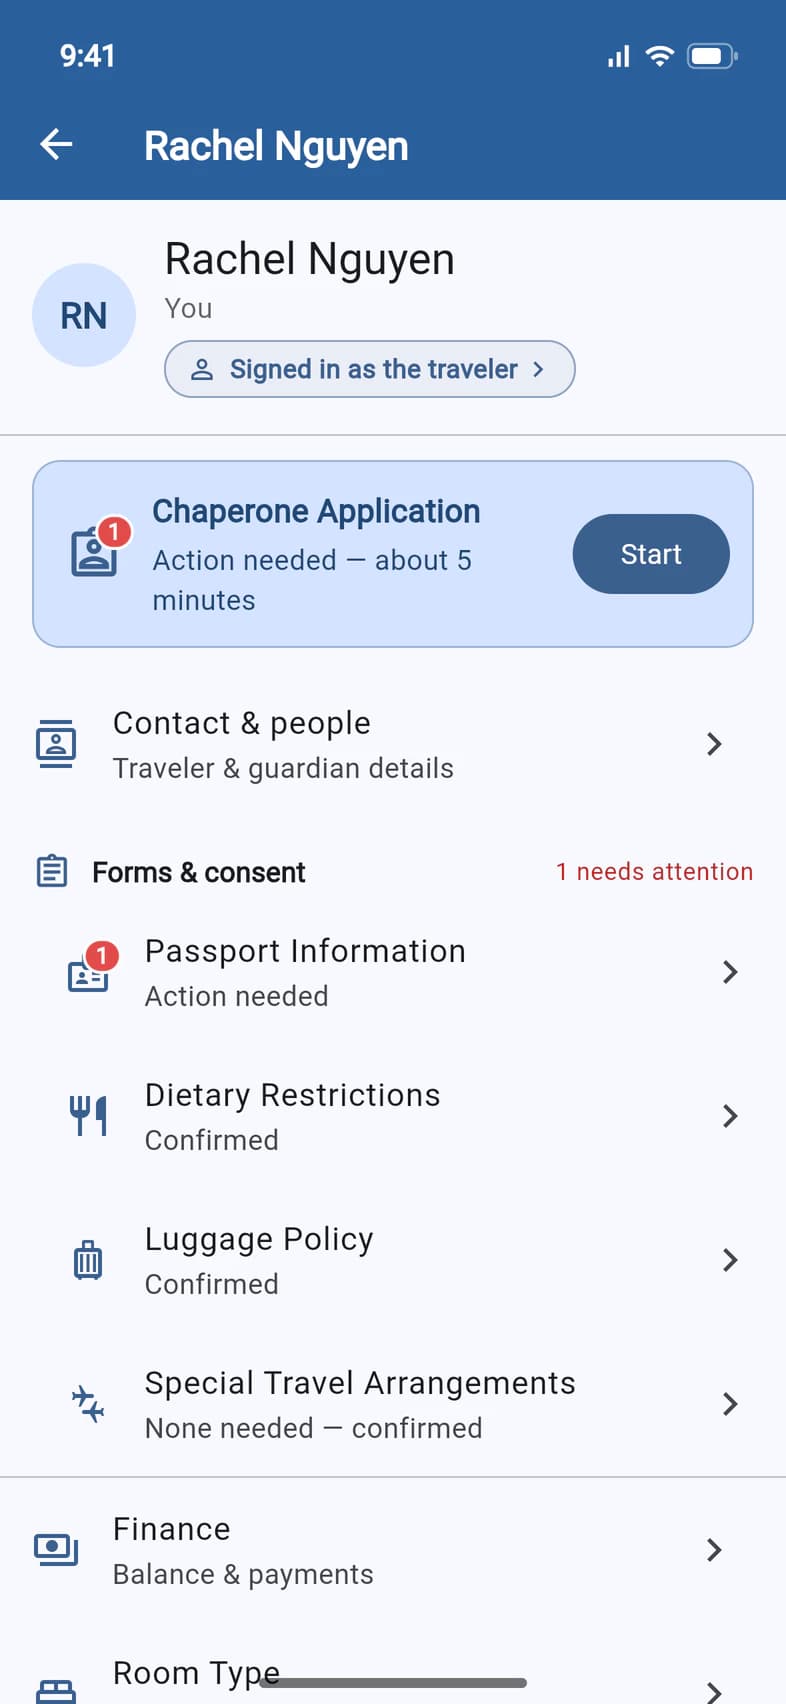
Tap My Account on Home (or the person icon at the top right). If you also look after a traveler on the trip, tap your own name first.
Until you've submitted it, your Chaperone Application is the card at the top of your record 1, marked Action needed — about 5 minutes. Tap Start, or anywhere on the card.
Just named by your group leader? The card says Start here — about 5 minutes, and your contact details and payments show on your record once your application is filed.
- Step 2
Tell us about you
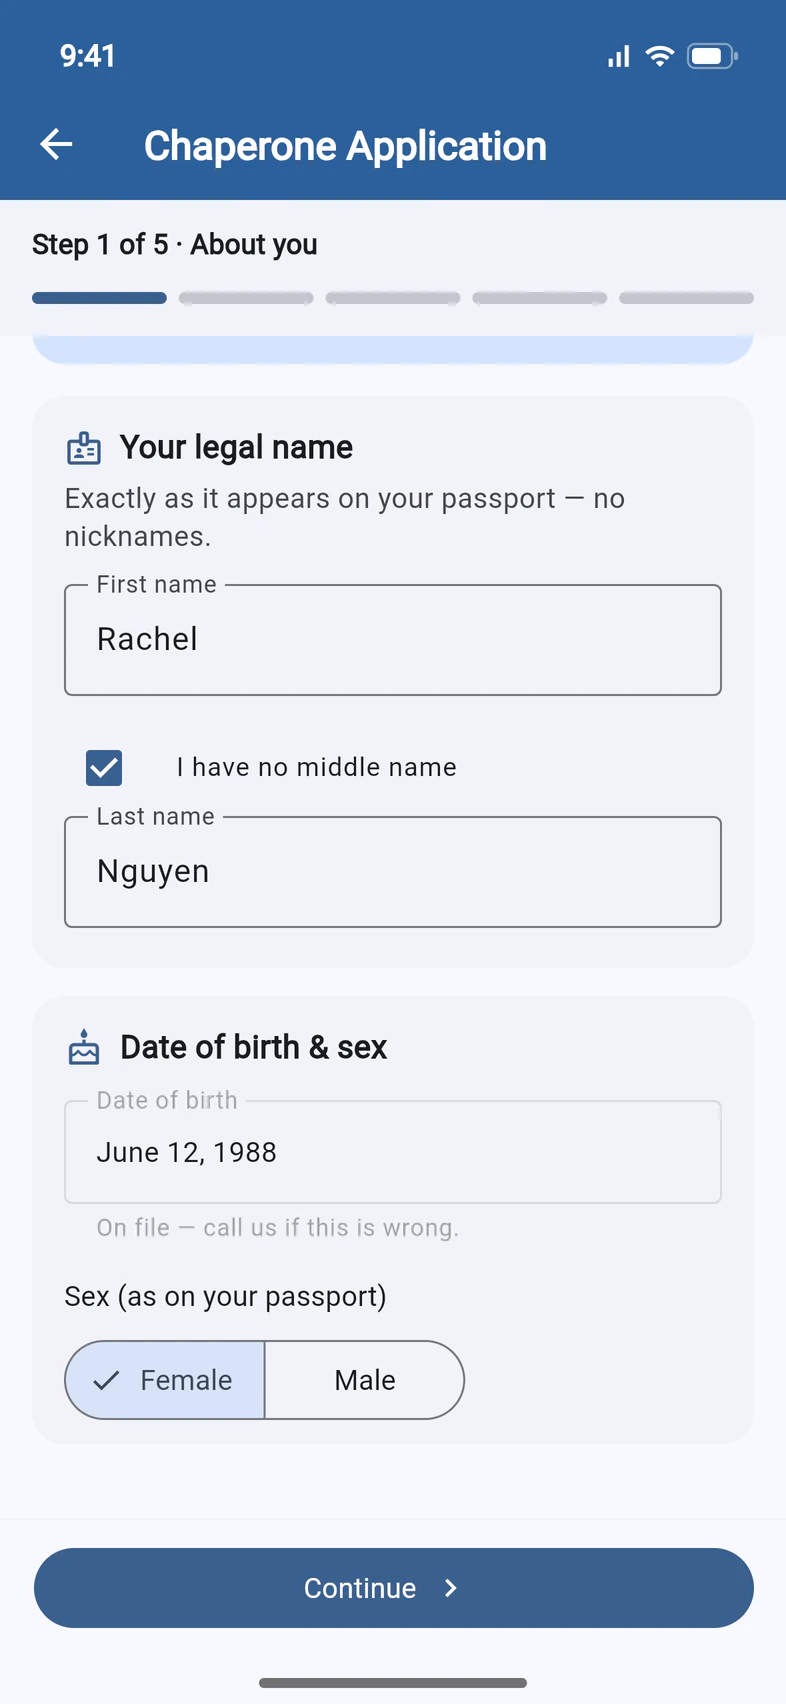
Step 1, About you, starts with Your legal name 1, filled in from Passports' records. It must match your passport exactly, with no nicknames. No middle name? Tick I have no middle name.
If Passports already has your date of birth, it's shown as on file 2. If not, type it as MM/DD/YYYY or pick it from the calendar. Then choose your Sex (as on your passport) 3 and tap Continue.
Chaperones aren't asked for a Social Security number.
- Step 3
Check your home address
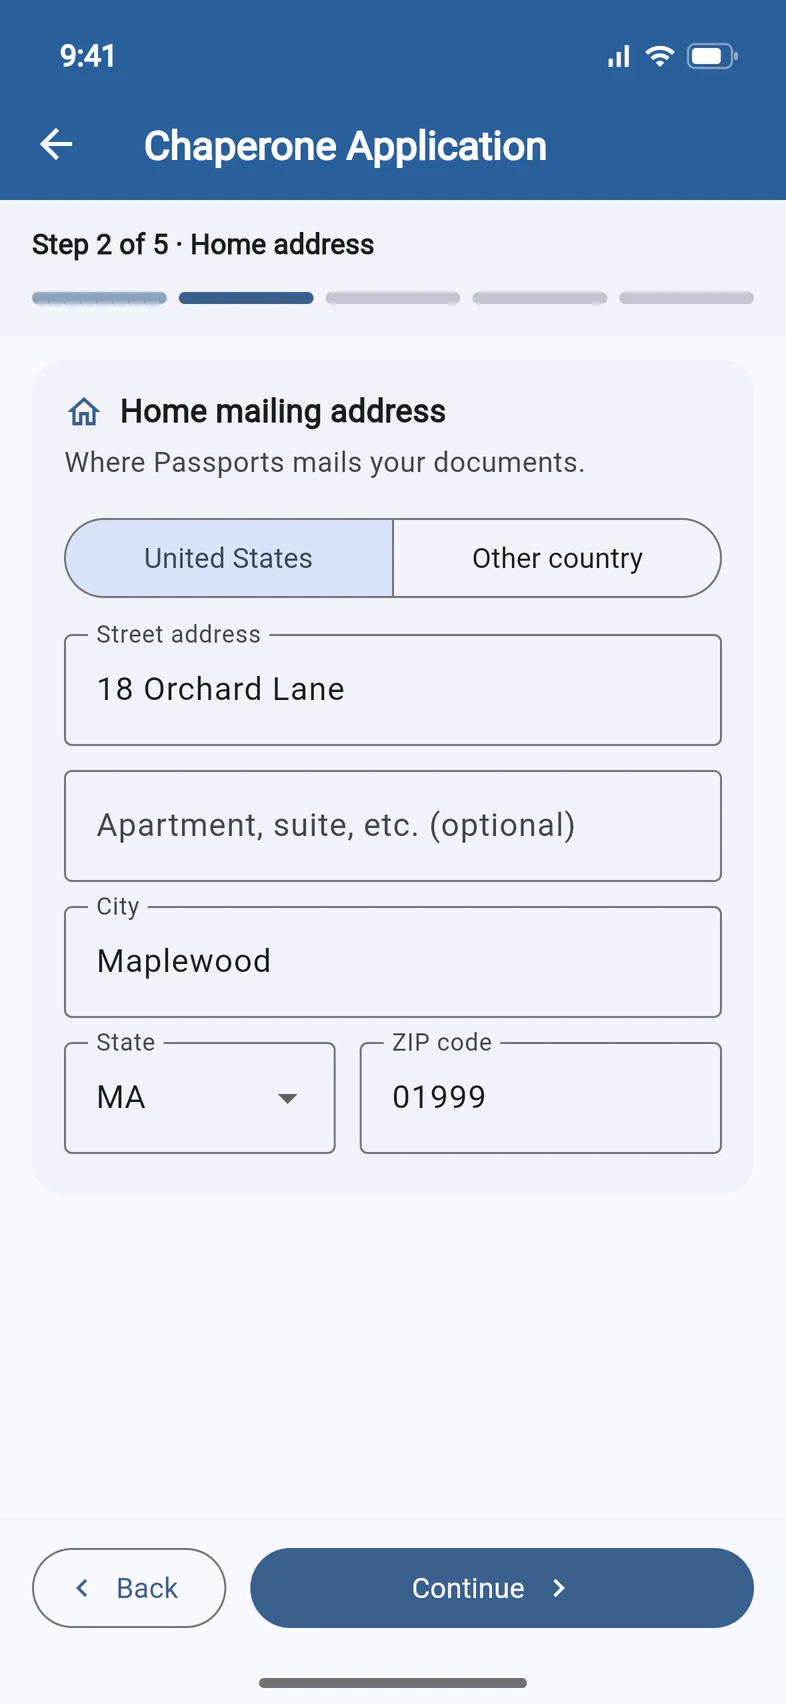
Step 2 is your Home mailing address, where Passports mails your documents. It's filled in from your record 1: check it, and fix anything that has changed.
Living outside the US? Tap Other country 2 and type the country, then put your province or region and your postal code on the second line. Tap Continue.
- Step 4
Add your contact details
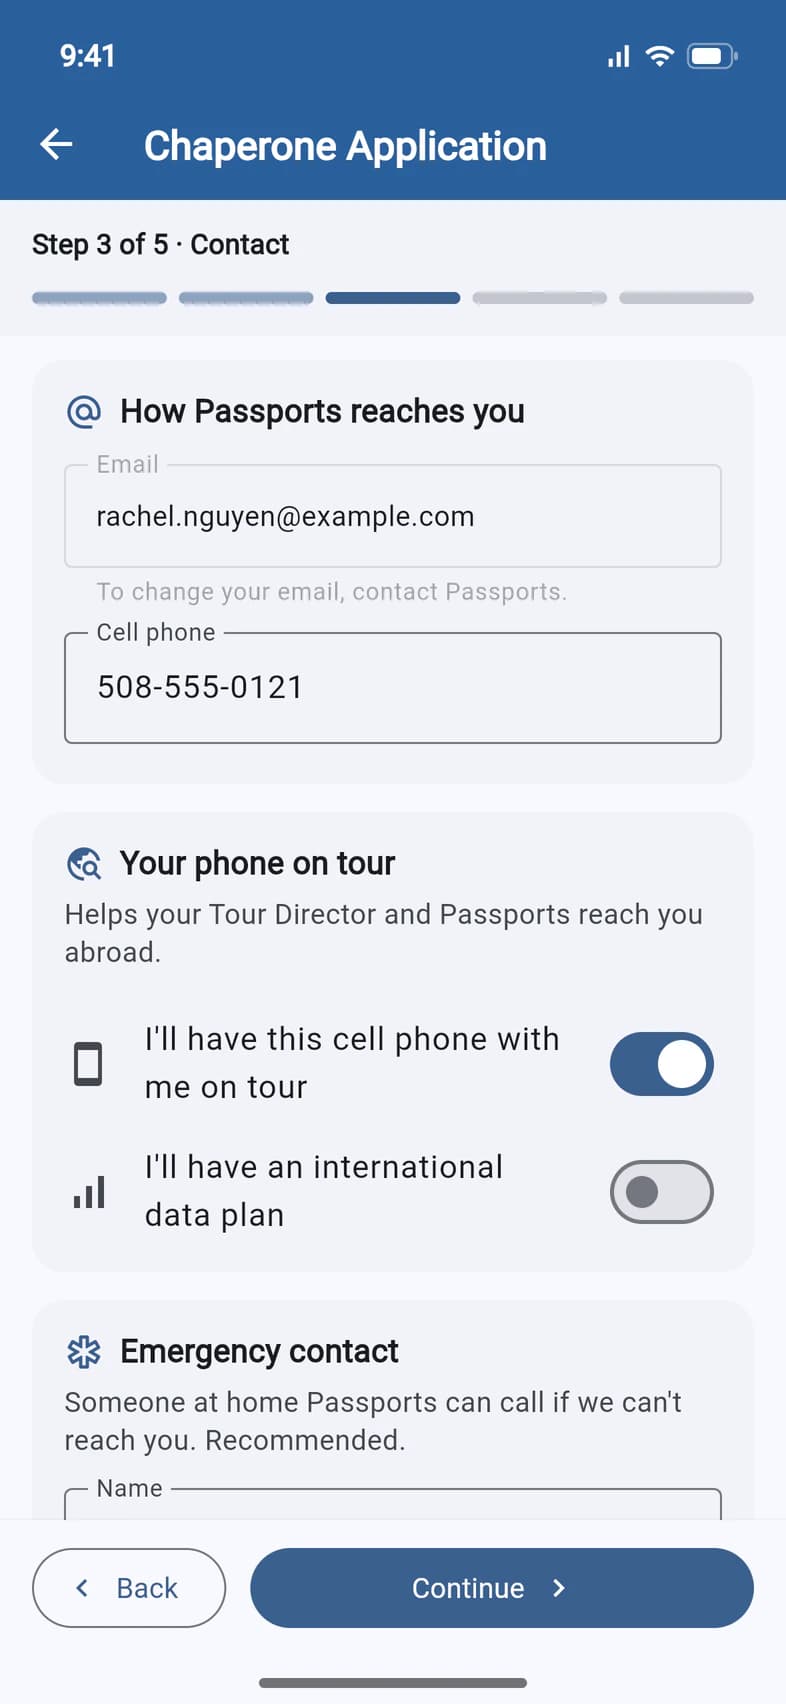
Step 3 is Contact. Your email is shown as Passports has it; to change it, contact Passports. Check your Cell phone 1.
Under Your phone on tour, turn on what applies: I'll have this cell phone with me on tour 2 and I'll have an international data plan. It helps your Tour Director and Passports reach you abroad.
Below, check your Emergency contact 3: someone at home Passports can call if they can't reach you. It's optional but recommended; give a name and a phone number together. Tap Continue.
- Step 5
Choose your room
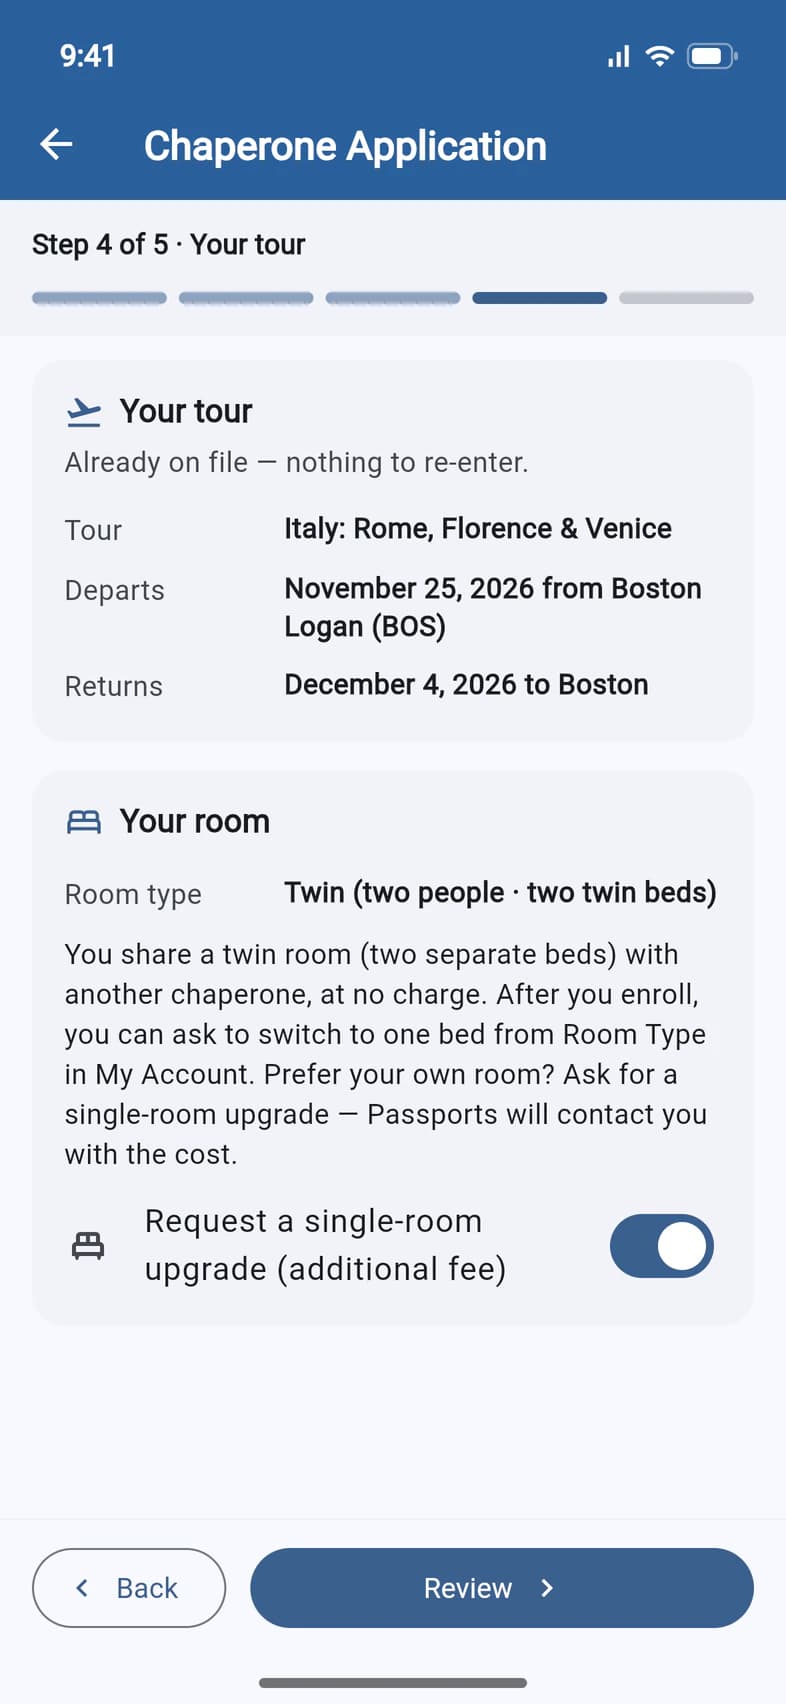
Step 4, Your tour 1, shows the tour and the dates Passports has on file: nothing to re-enter.
Under Your room, the Room type shows the room you share with another chaperone, at no charge 2: a twin has two separate beds, a double one bed. After you enroll, you can ask to switch from Room Type in My Account. Prefer your own room? Turn on Request a single-room upgrade (additional fee) 3, and Passports contacts you with the cost. Tap Review.
The single-room upgrade costs extra, and Passports contacts you with the price. You'll see the switch only when your room on file is a double or twin.
- Step 6
Check your answers
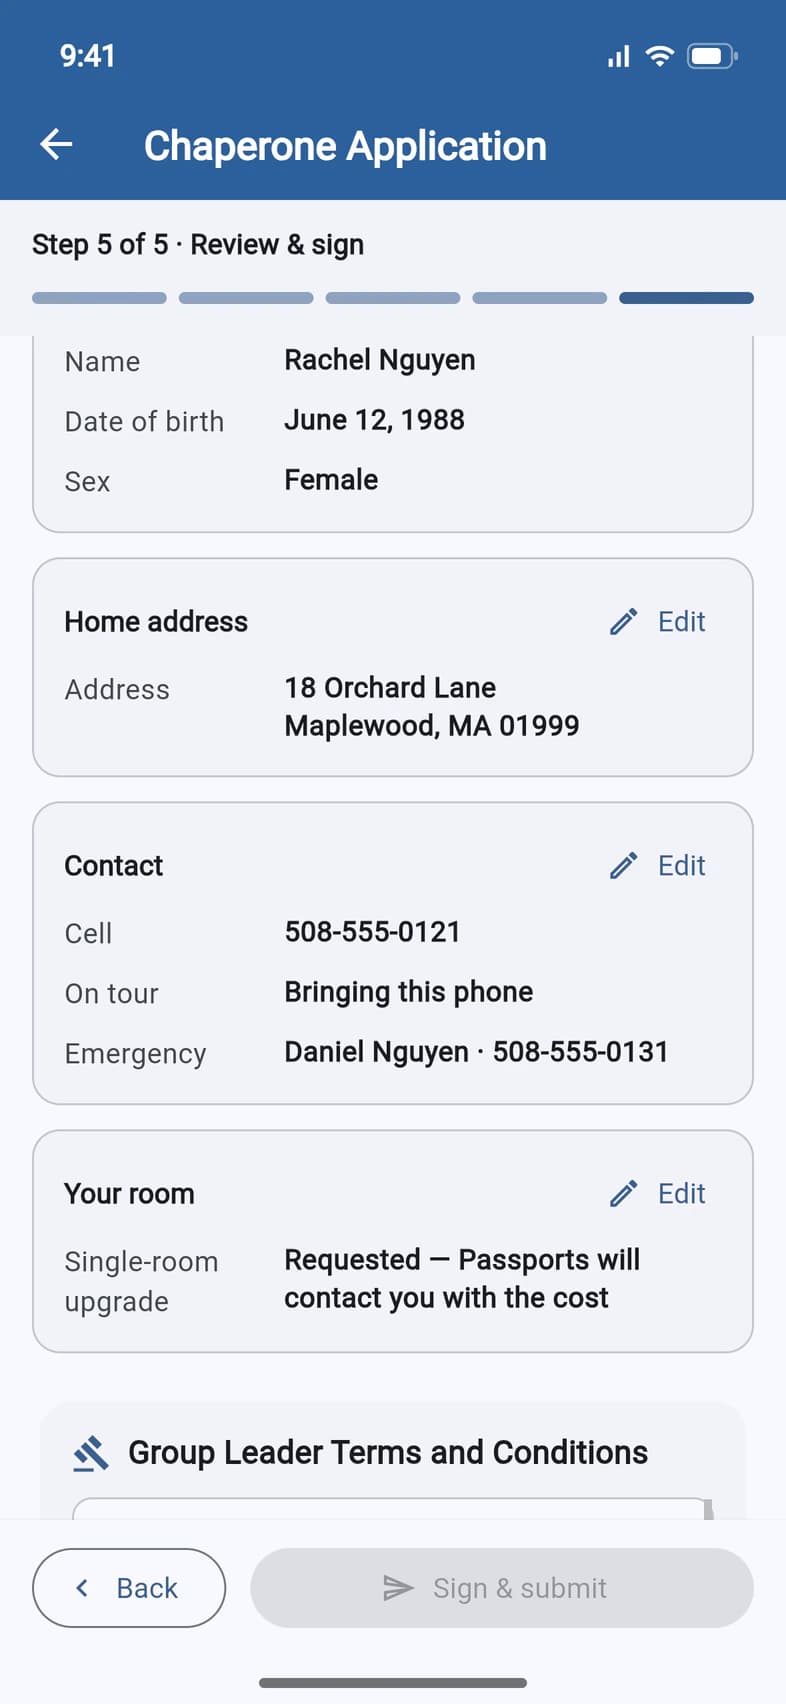
Step 5, Review & sign, starts with Check your answers: everything you entered, card by card. If you asked for a single-room upgrade, Your room says so 1.
To change something, tap Edit 2 on that card. When you're done there, Back to review brings you straight back.
- Step 7
Agree and sign
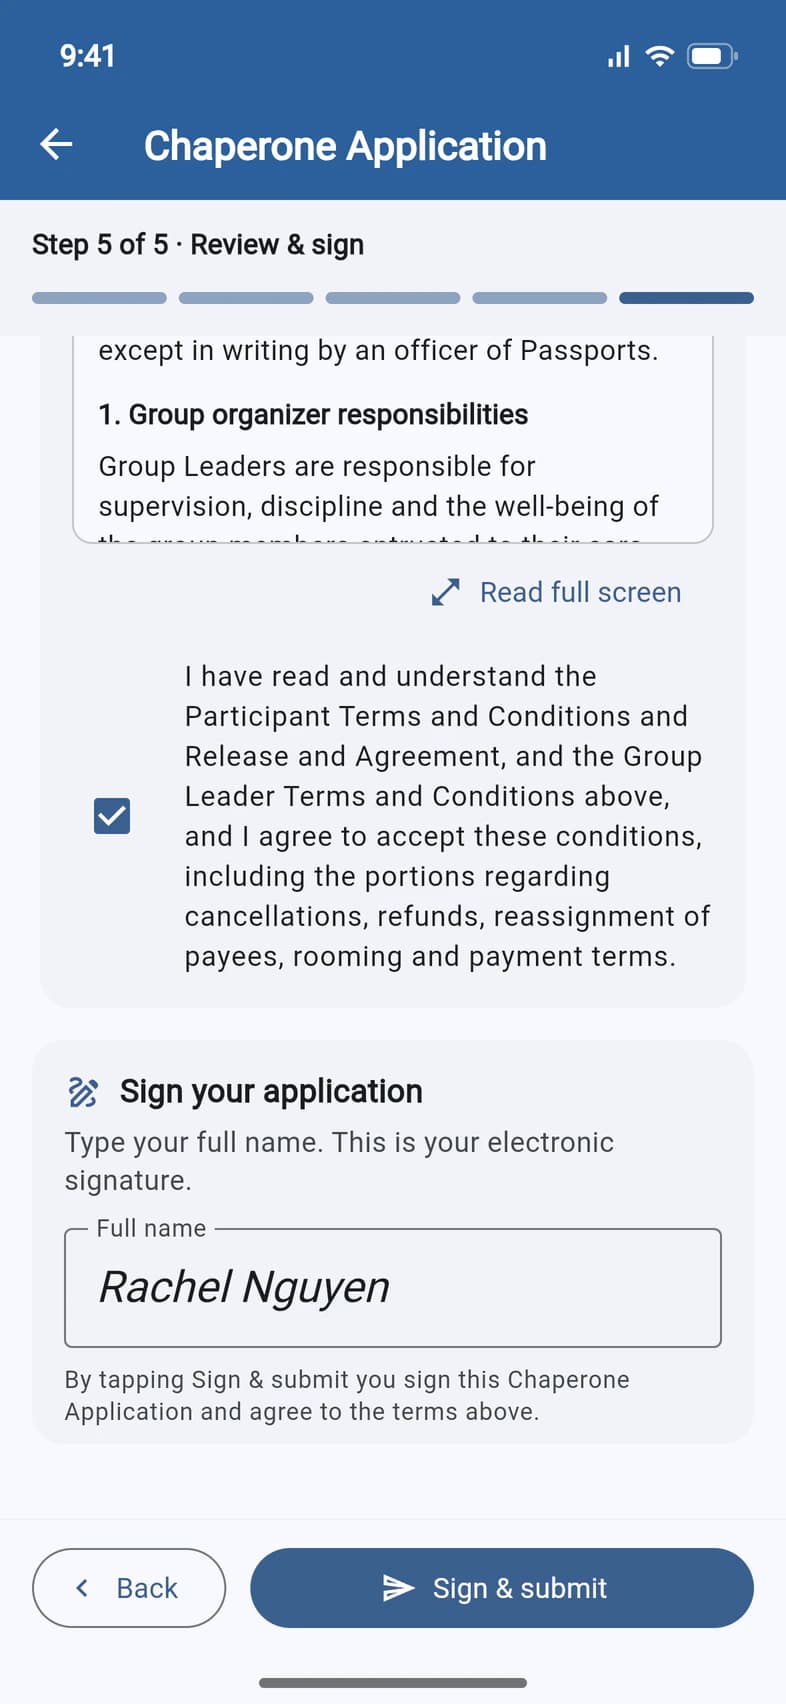
Scroll down to the Group Leader Terms and Conditions. Read them in the box, or tap Read full screen 1. Then tick the box 2 to agree to them and to the Participant Terms and Conditions and Release and Agreement.
Under Sign your application, type your full name 3. That's your electronic signature, so it must start with your first name and end with your last name. Then tap Sign & submit 4: it stays greyed out until the box is ticked and your name is typed.
You can submit your application only once. After that, changes go through Passports, so check everything before you tap Sign & submit.
- Step 8
You're done
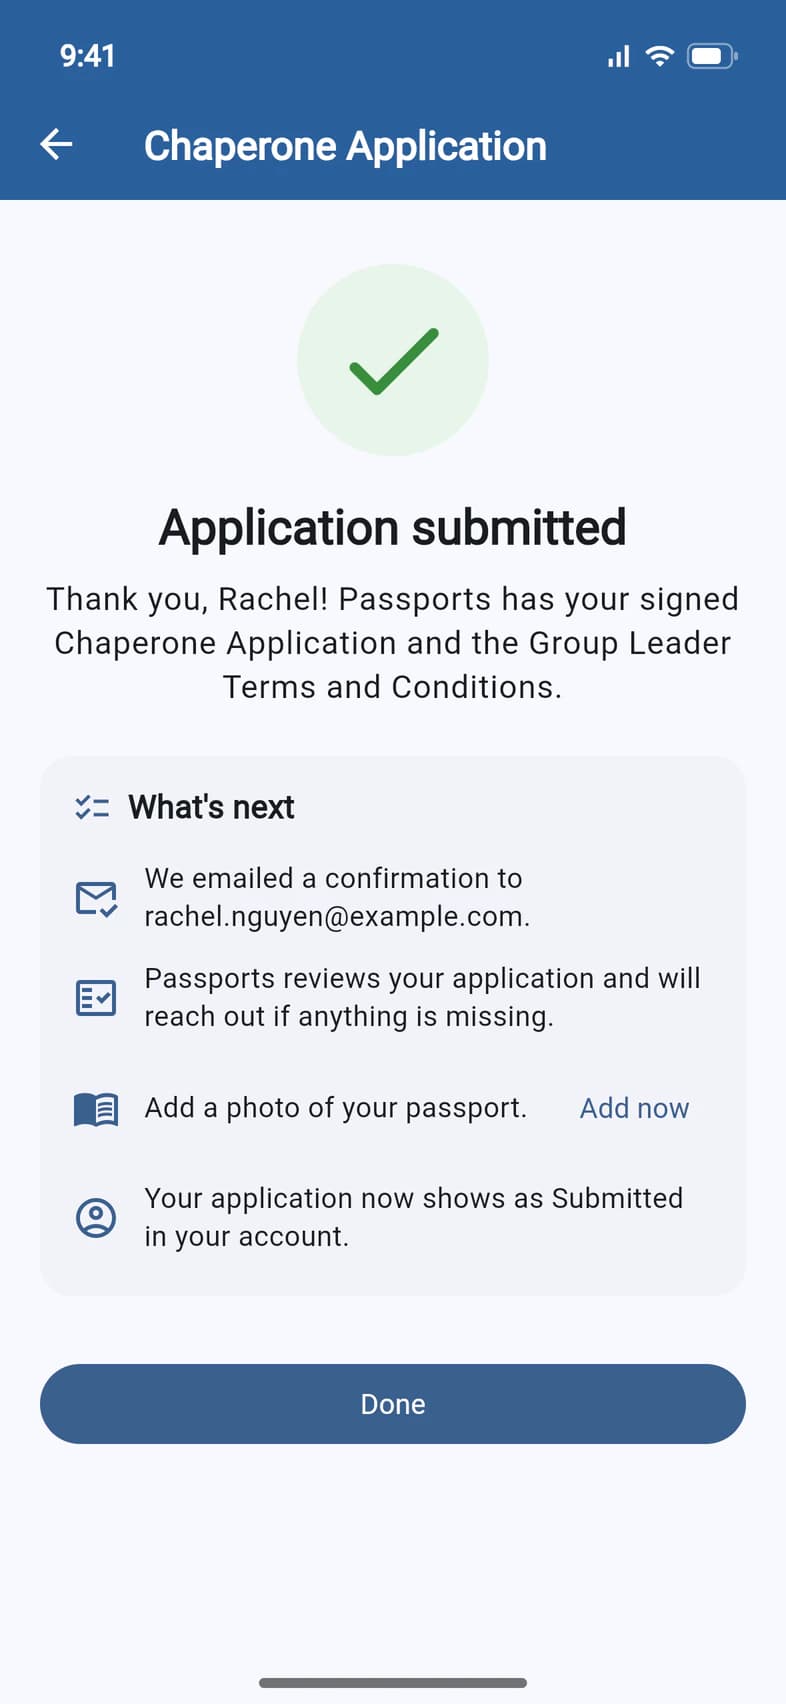
Application submitted. Under What's next, PassportsGo shows where Passports emailed your confirmation 1, and anything still missing, like a photo of your passport: Add now takes you there. Tap Done 2.
Back on your record, the application is now a row under Forms & consent that says Submitted with the date. Open it any time to see what you filed.
Good to know
Do I need my Social Security number?
No. Chaperones are never asked for one. If PassportsGo asks you for it, update the app: an older version showed an optional field.
Can I save it and finish later?
No. Your answers are saved only when you sign and submit. Going back takes you to the step before, and if you leave the application, PassportsGo asks Leave the application? first. It takes about five minutes, so do it in one go.
I made a mistake after submitting.
You can submit the application only once. To change something, call Passports at 1-800-332-7277. Open the application in PassportsGo any time to see exactly what you filed.
My date of birth is wrong.
Once Passports has it, the application shows it as On file — call us if this is wrong. Call Passports at 1-800-332-7277. More than 120 days before departure, you can also fix it yourself: on your record, tap Contact & people, then the pencil at the top.
My name is grayed out.
From 120 days before departure, names are locked, because airline tickets are issued from them. The application says so; call Passports at 1-800-332-7277 if anything is wrong.
I can't find the application.
It's on a chaperone's own record only, at the top until you file it. If you also look after a traveler, open your own name in My Account, not your traveler's. A trip that has already traveled has no application: if you're going on an upcoming trip, switch to it from ☰ › Enrolled Tours, where the old one is marked PAST. Still missing? Call Passports at 1-800-332-7277.
I didn't get an invitation.
Check your spam folder for the email from Passports, or sign in to PassportsGo with your email address and open My Account. Your group leader can also resend the invitation, or fix a mistyped email, from their Chaperones page: see Name and invite your chaperones.
Screens show a sample family and tour — your names, dates and amounts will differ. Checked against the app October 12, 2026.
Call us. A real person in Worcester picks up.
Monday to Friday, 8am to 4pm Eastern — and around the clock once your group is on tour. Or email passportsgo@passports.com.