
Split your group into buses or groups
Make colored groups for buses, tickets or classes, place everyone in a few taps, show each traveler their group on the day, and print the list.
Sort your group into colored groups: two buses, three museum entry times, a few cooking classes. Each traveler then sees their own group on Home, in its color with a big letter, so everyone knows which bus to get on.
Making a grouping and placing people never notifies anyone. Travelers see their group only while the grouping is showing, and get a notification only when you send it.
Before you start
- PassportsGo on your phone, or passportsgo.com in a browser — signed in as the group leader, or as a chaperone you've made an admin.
- Step 1
Open Groupings
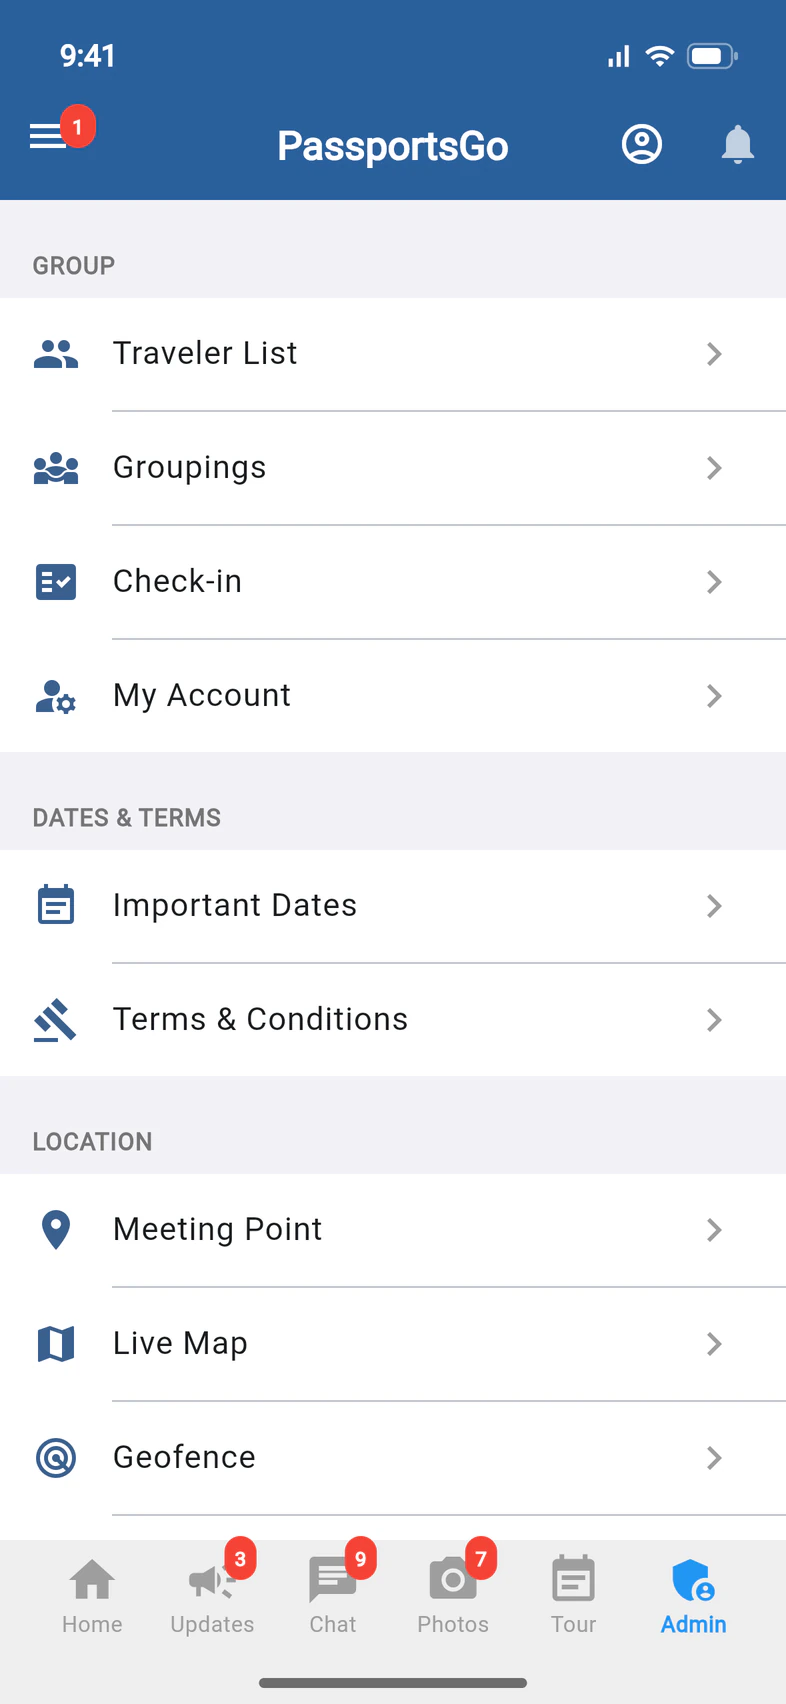
Tap Admin 1 at the bottom of the screen, then Groupings 2 under Group.
The Groupings page lists the groupings you've made, with New grouping at the bottom. Its first row, Check in the whole group, is a roll call for everyone: see Check everyone in.
Chaperones you've made admins see Groupings too, and your Tour Director has it in their own app: any of you can make and change groupings. Visitors can't.
- Step 2
Make a grouping
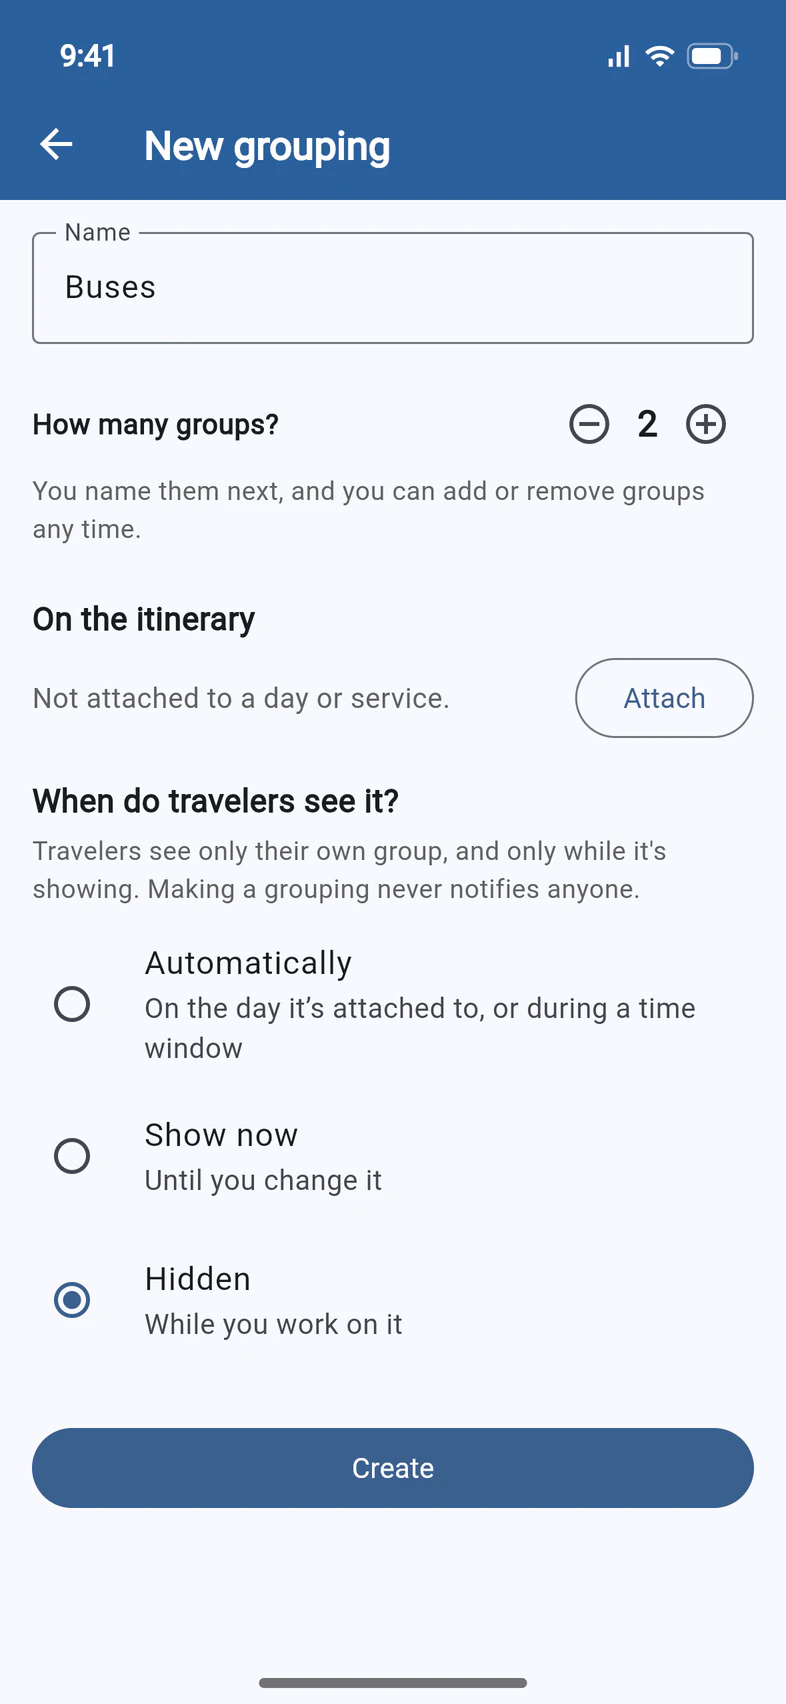
Tap New grouping. Give it a Name 1, like Buses, and choose How many groups? 2. You can add or remove groups later.
Under When do travelers see it?, pick one:
- Automatically: all day on the day you attach it to, or between a start and an end time you set.
- Show now: from now until you change it.
- Hidden 3: while you work on it. Nobody sees it until you show it.
Then tap Create 4.
Attach, under On the itinerary, ties the grouping to a day or a visit, like your museum entry. Set to Automatically, it then shows all that day, and travelers also see their group on that day's plan. Start and end times follow the clock where the tour is, wherever you are when you set them.
- Step 3
Put everyone in a group
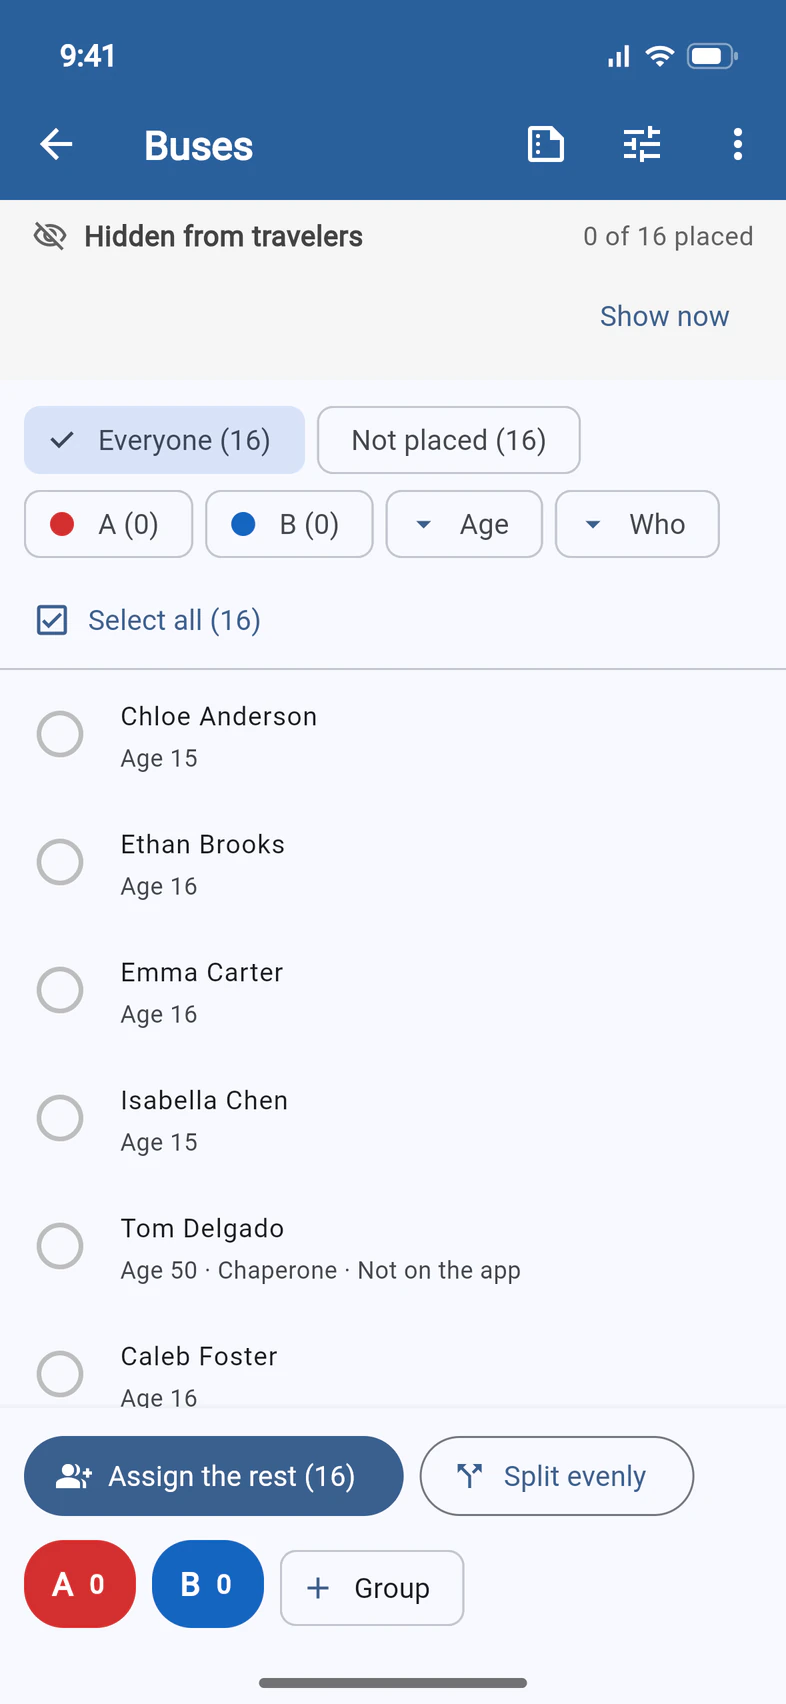
Your new grouping opens with everyone Not placed. Start with the fast ways:
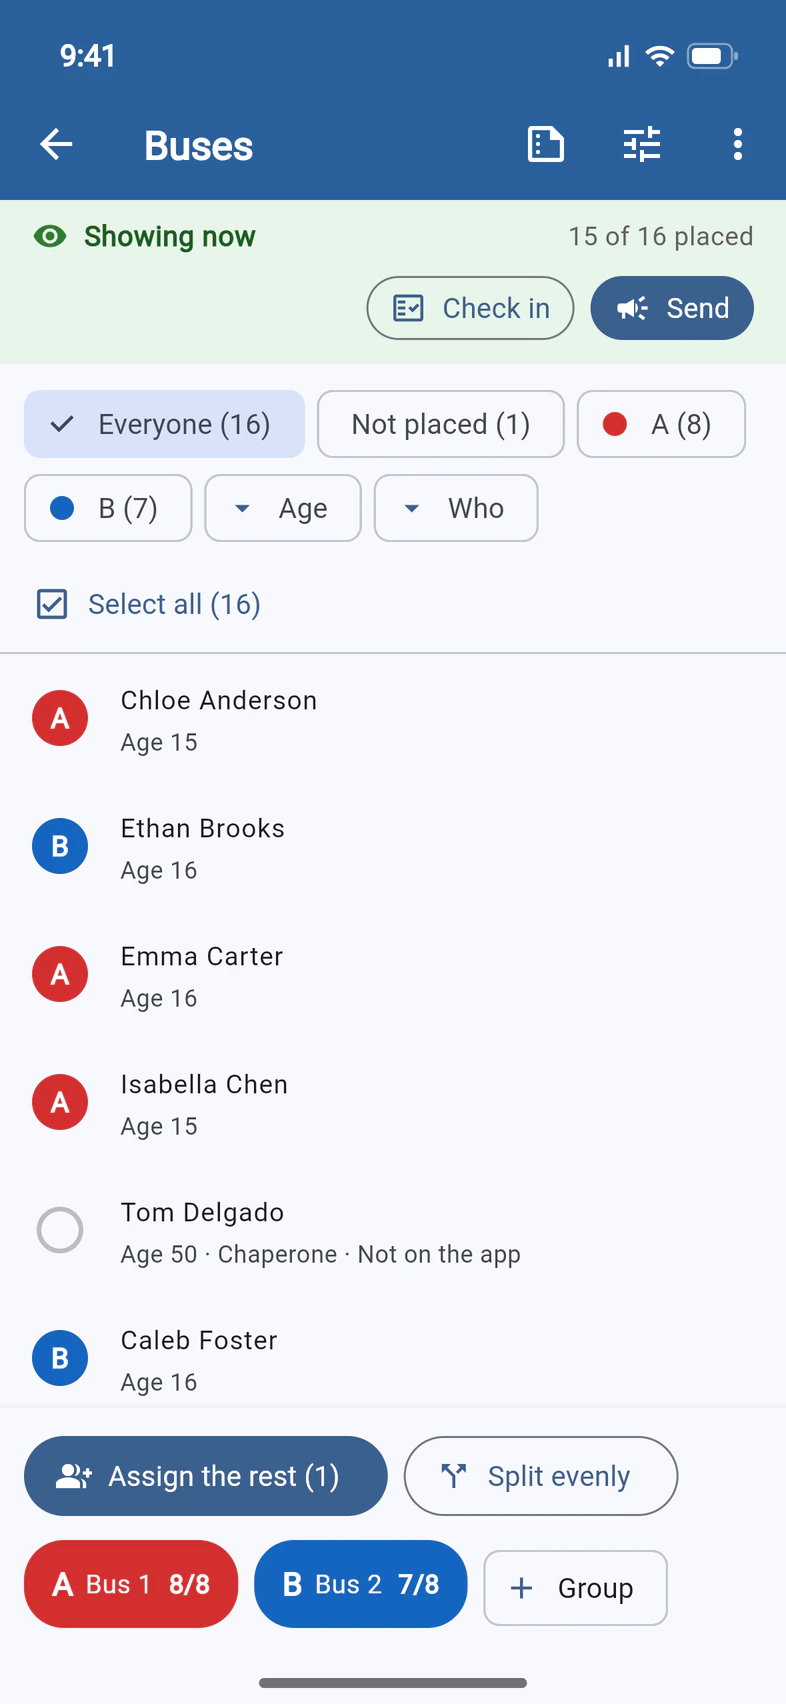
- Split evenly 1 shares everyone not placed yet across the groups you tick, by last name, so families mostly stay together.
- Assign the rest 2 puts everyone not placed yet into one group you pick.
- Select all 3, or tap names one at a time, then tap a group's button at the bottom 4. Group there adds another group.
To work on part of the group, filter first: by Age, by Who (travelers, or leaders and chaperones), Not placed or one group. After each change, Undo shows beside the buttons for 20 seconds.
On a computer, the groups sit beside the list as cards, and you can drag names onto them.
- Step 4
Name the groups
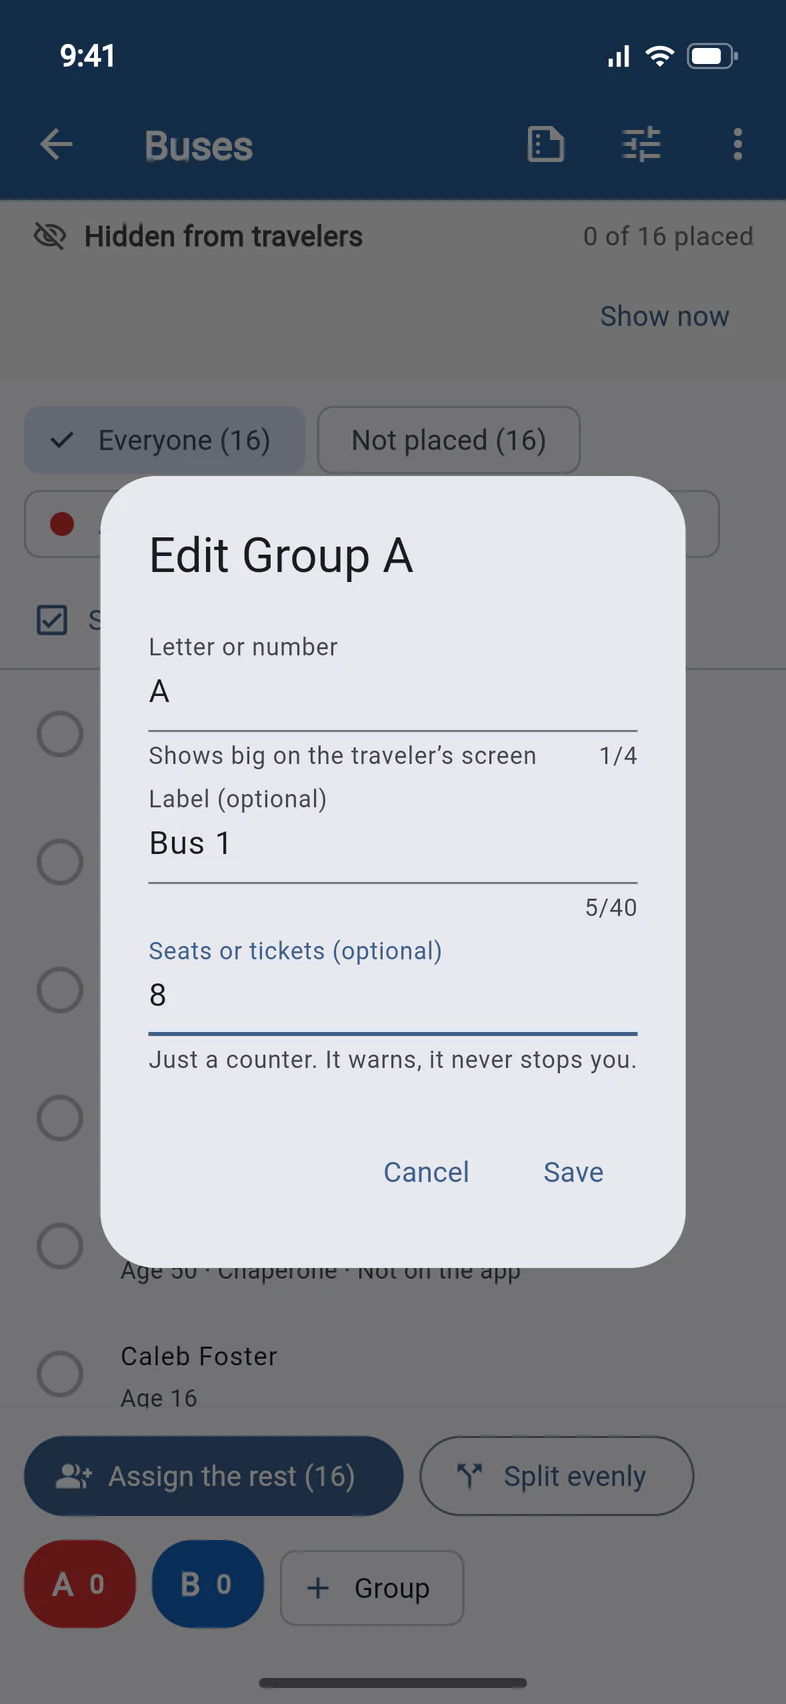
With nobody selected, tap a group's button, like A, then the pencil beside its name.
- Letter or number is what shows big on your travelers' screens. The colors are set for you.
- Label (optional) 1 is what people look for, like Bus 1, Jack's group or 10:30 group.
- Seats or tickets (optional) 2 is how many fit. The group's button counts up to it.
Tap Save 3.
Tapping a group's button with nobody selected also offers Assign the rest here, Clear this group and a way to remove the group. Once people are in it, there's Check in too, and on a phone See on the Live Map, which shows just that group's people.
- Step 5
Show it, then send it
Travelers see their group only while the grouping is showing. The bar at the top says which: Hidden from travelers, with a Show now button, or Showing now 1. Beside it is how many people are placed 2.
Showing it doesn't notify anyone: travelers see their group the next time they look at PassportsGo. To tell them now, tap Send 3. It's there only while the grouping is showing.
While a grouping is showing, your own Home has a row for it, like "Buses is showing". Tap it to come straight back to this page.
- Step 6
Choose who gets it
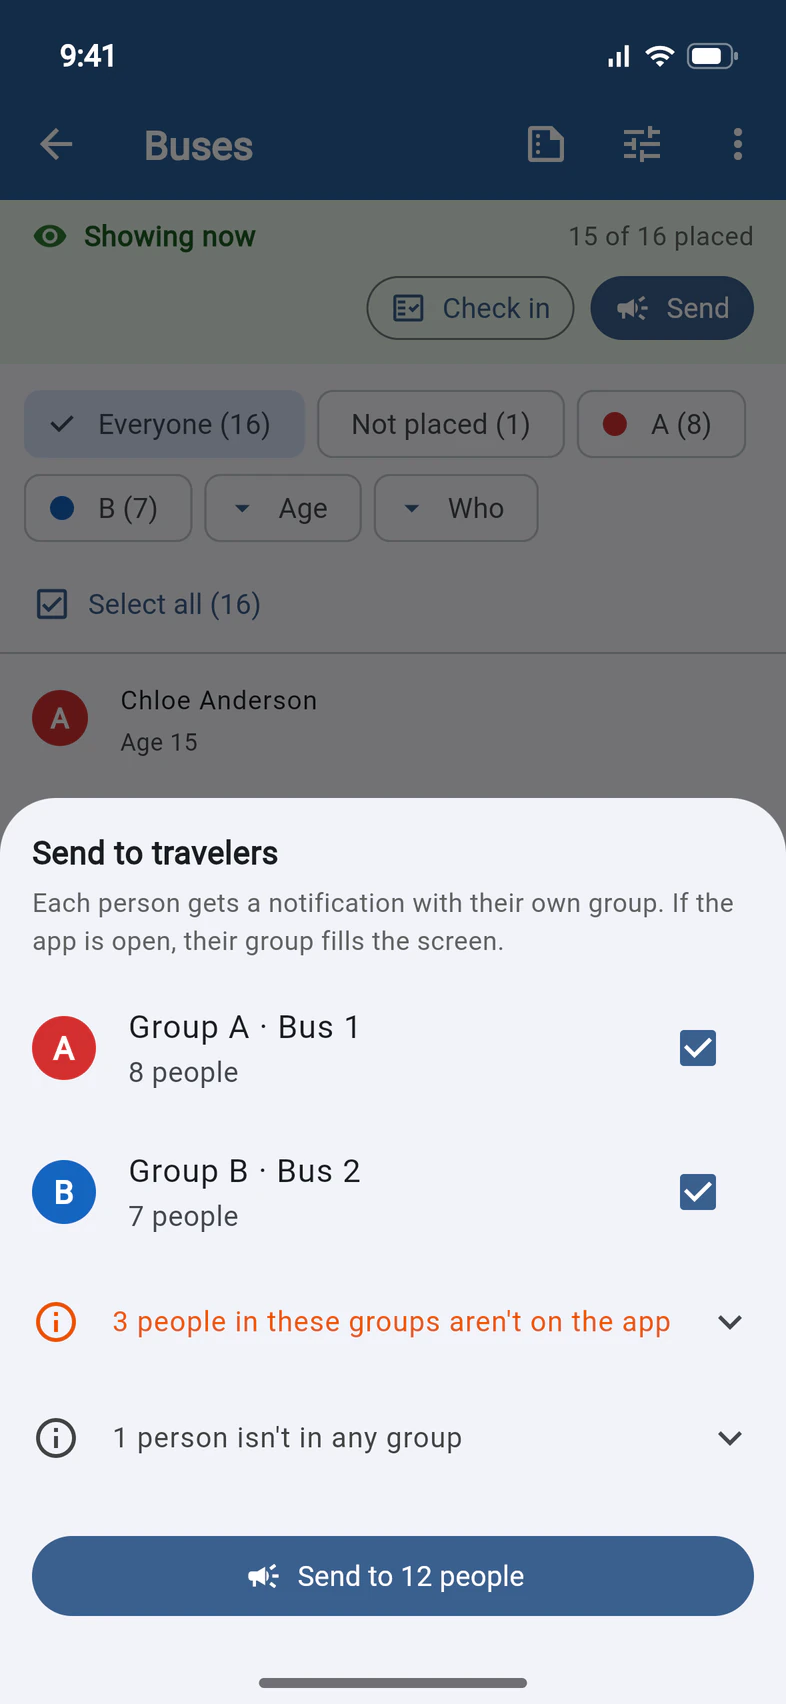
Every group is ticked 1. Untick any that aren't ready: you can send the 10:30 group at 10:30 and the 10:45 group at 10:45.
The sheet also names who it won't reach 2: people in these groups who aren't on the app, and anyone who isn't in any group. Tap a line for the names, and tell those people in person.
Tap Send to 12 people 3. Each person gets a notification with their own group, like "Group A · Bus 1", and if the app is open, their group fills the screen.
- Step 7
See what travelers see
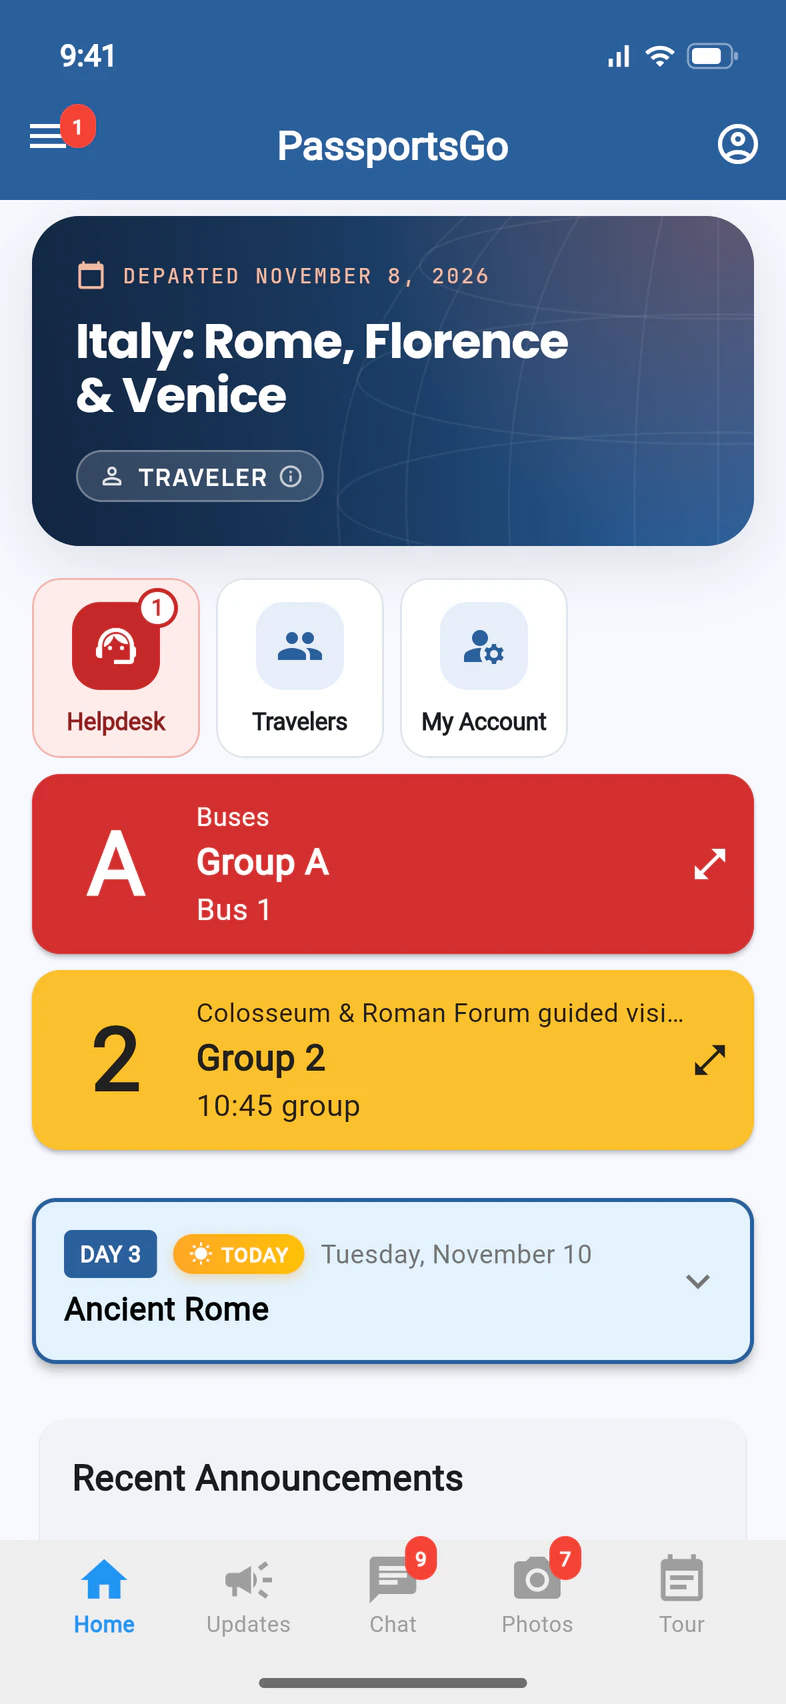
While the grouping is showing, everyone you've placed has a card on Home in their group's color 1: the big letter, the grouping's name, the group and its label. Each grouping that's showing gets its own card: here Emma also has her entry time for today's Colosseum visit.
Tapping the card fills the screen with their group, big enough to hold up at the bus door, with Close to go back. Travelers see only their own group, never who else is in it.
A grouping attached to a day or a visit also shows each traveler's group as a colored chip on that day's plan, on the Tour tab and in today's plan on Home.
- Step 8
Print the bus list
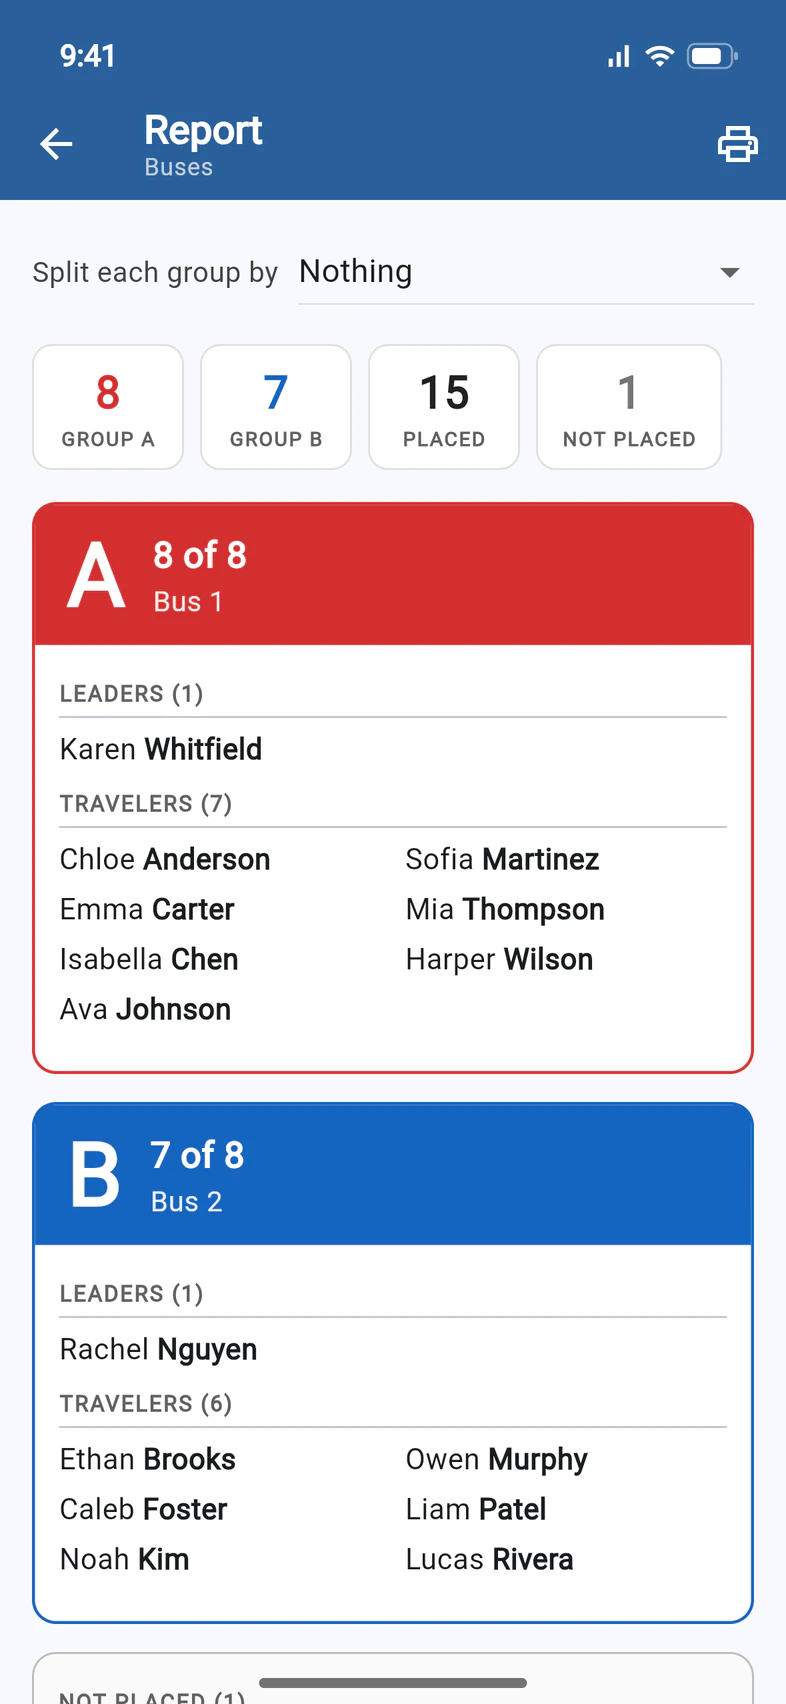
On the grouping's page, tap the report icon at the top, the first of the three. Report counts each group and lists who's in it, leaders first, by last name.
Split each group by 1 breaks each group down by another grouping, like who has which museum time on each bus.
Tap the printer 2 for a page to print: choose Letter or A4, add a line across the top if you like ("Please ride your assigned bus all day."), then tap Print, or Share on a phone (Download on a computer).
Good to know
Does making a grouping notify anyone?
No. Making one, placing people and showing it send nothing: travelers simply see their group on Home the next time they look at PassportsGo. A notification goes out only when you tap Send, or Tell after moving someone.
Can parents see their child's group?
Only on the day-by-day plan. When a grouping is attached to a day or a visit, parents see their child's group on it while it's showing, with the child's name, like "Emma: Group A · Bus 1". They get no colored card on Home, no full screen and no notification.
Can travelers see who else is in their group?
No. Each traveler sees only their own group. Only you, your admins and your Tour Director see who's in each one.
What happens when a bus is full?
If you set Seats or tickets for a group, its button counts up to it (8/8) and gets a red border when you go over. It only warns: you can still place people there.
I moved someone after sending. Do they know?
Not yet: moving someone never sends anything by itself. After you move people in a grouping you've already sent, a Tell button with their first name (or Tell 2 people) appears beside Undo. Tap it to send the new group to just them. It lasts as long as Undo does, 20 seconds; after that, tap Send and tick only their group.
How do I check everyone is on the bus?
Tap Check in on the grouping's page, or a group's button and then Check in, and tick people off as they board. See Check everyone in.
Can I copy the list or reuse a grouping?
Yes. On the grouping's page, the ⋮ menu has Copy the list, which puts every group's names on your clipboard to paste into a message, and Duplicate, which makes a hidden copy with the same people, ready for the afternoon's buses. Delete is there too. To rename a grouping or change when it shows, tap the settings icon at the top.
We share our tour with another school. How does it work?
You can still make your own groupings. Your Tour Director can also make one for the whole tour: it's on your Groupings list marked From your Tour Director. You see where your own people are, but only your Tour Director can change it or send it.
Screens show a sample family and tour — your names, dates and amounts will differ. Checked against the app November 10, 2026.
Call us. A real person in Worcester picks up.
Monday to Friday, 8am to 4pm Eastern — and around the clock once your group is on tour. Or email passportsgo@passports.com.