
Review your tour proposal
Your Tour Proposal in PassportsGo: the itinerary and what's included, your tour options and their price, your Tour ID, saving your changes, and comparing several proposals.
Your Tour Proposal is the trip your Tour Advisor built for your group, on one page in PassportsGo: the day by day, what's included, and your price per traveler, worked out exactly as families see it on your enrollment page.
Make it yours: add excursions, decide on the extension, set your Tour ID, and tap Save changes. You can keep changing things until your advisor orders your recruitment materials or the first family enrolls. Nothing is charged to anyone.
Before you start
- PassportsGo on your phone, or passportsgo.com in a browser — signed in as the group leader.
- Step 1
Open your tour proposal
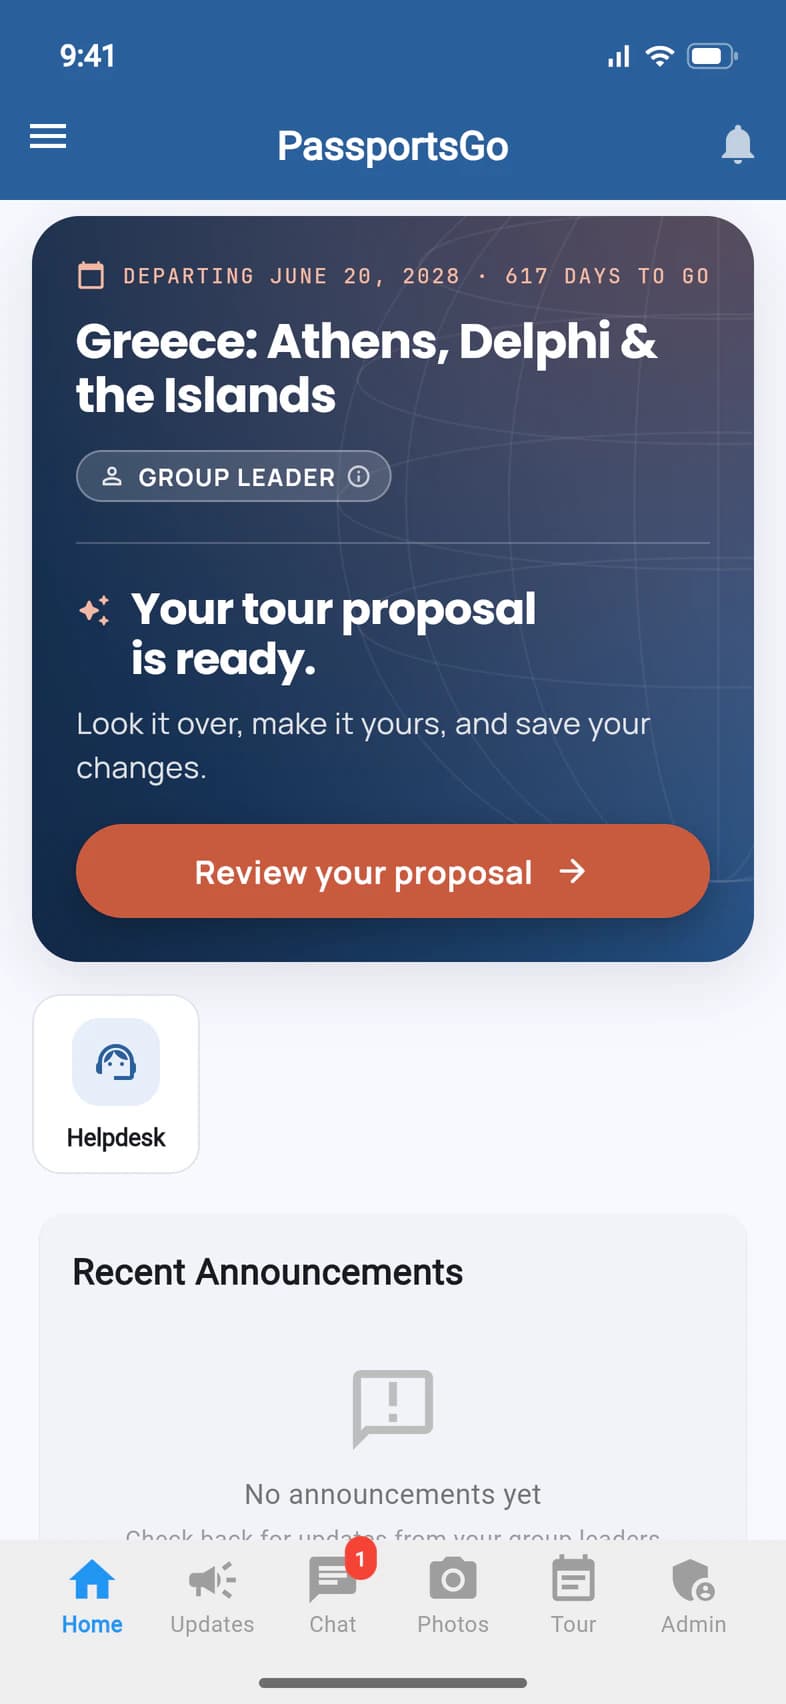
On Home, the title card for your tour says Your tour proposal is ready. Tap Review your proposal 1.
The link in your Tour Advisor's email opens the same page, and so does Admin 2 › Tour proposal, any time.
Have more than one proposal? Home counts them instead (You have 3 tour proposals.) with a See your proposals button: see the step on comparing them below.
- Step 2
Look through your tour
The top of the page shows your dates, where you fly from and your price per traveler, then photos of the trip and, when your tour has one, a short tour video.
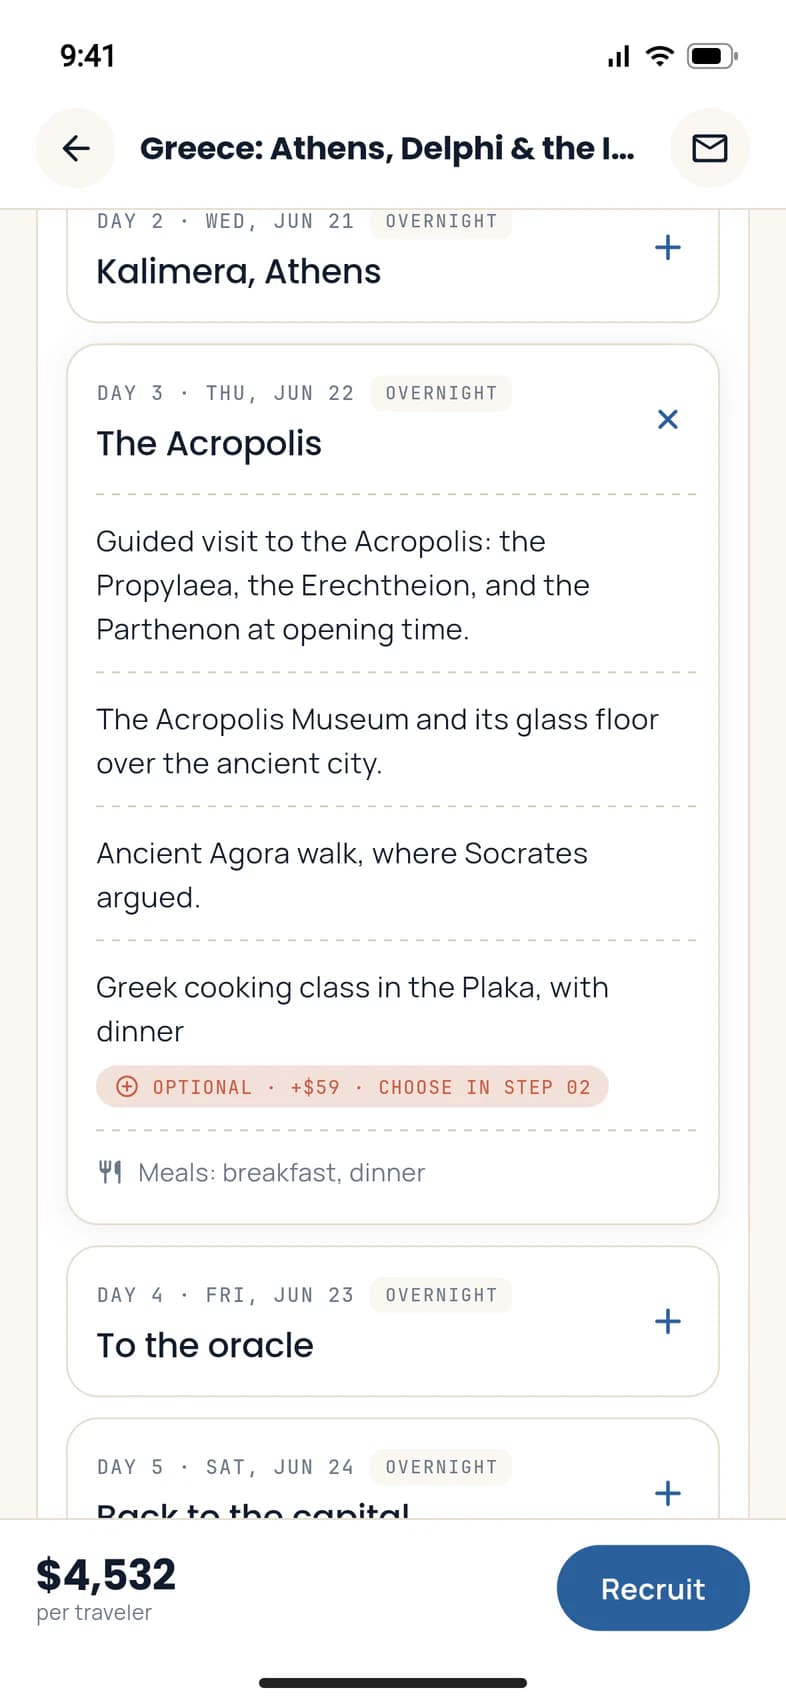
Scroll down to Step 01, Your tour, day by day. It's the itinerary your travelers see when they enroll. If your tour has a route map, it comes first: tap Play the route to watch the trip unfold, or Explore the map to open it full screen. At a glance sums up the days, hotel nights and meals.
Every day starts closed. Tap a day 1 to open it. An excursion marked OPTIONAL 2 isn't part of your tour yet: you choose it in Step 02. Under the days are What's included and the fine print.
- Step 3
Add excursions for your group
Step 02, Tour options, holds the choices. Each one updates your price as you go.
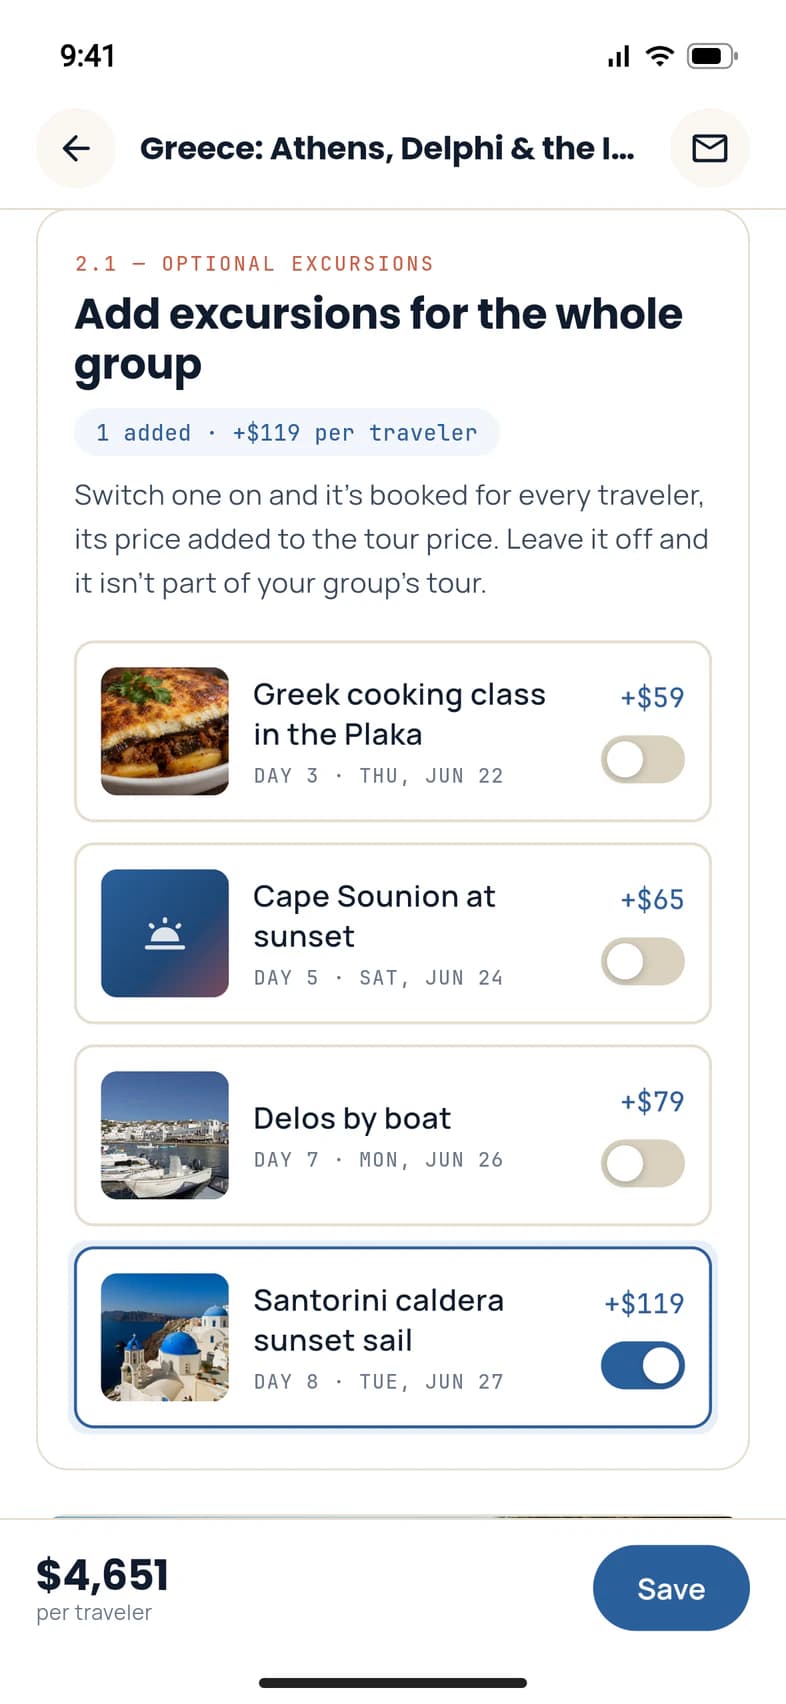
Under Add excursions for the whole group, switch on an excursion 1: it's booked for every traveler, and its price is added to the tour price. Leave it off and it isn't part of your group's tour. The count above 2 adds up what you've switched on.
The price at the bottom of the screen 3 follows every choice. Tap Save beside it to jump to Step 04.
Some proposals also list More options for your group, like a hotel upgrade. Those aren't switches: ask your Tour Advisor to add one.
- Step 4
Pick the extension and more
If your tour has an extension, choose who goes:
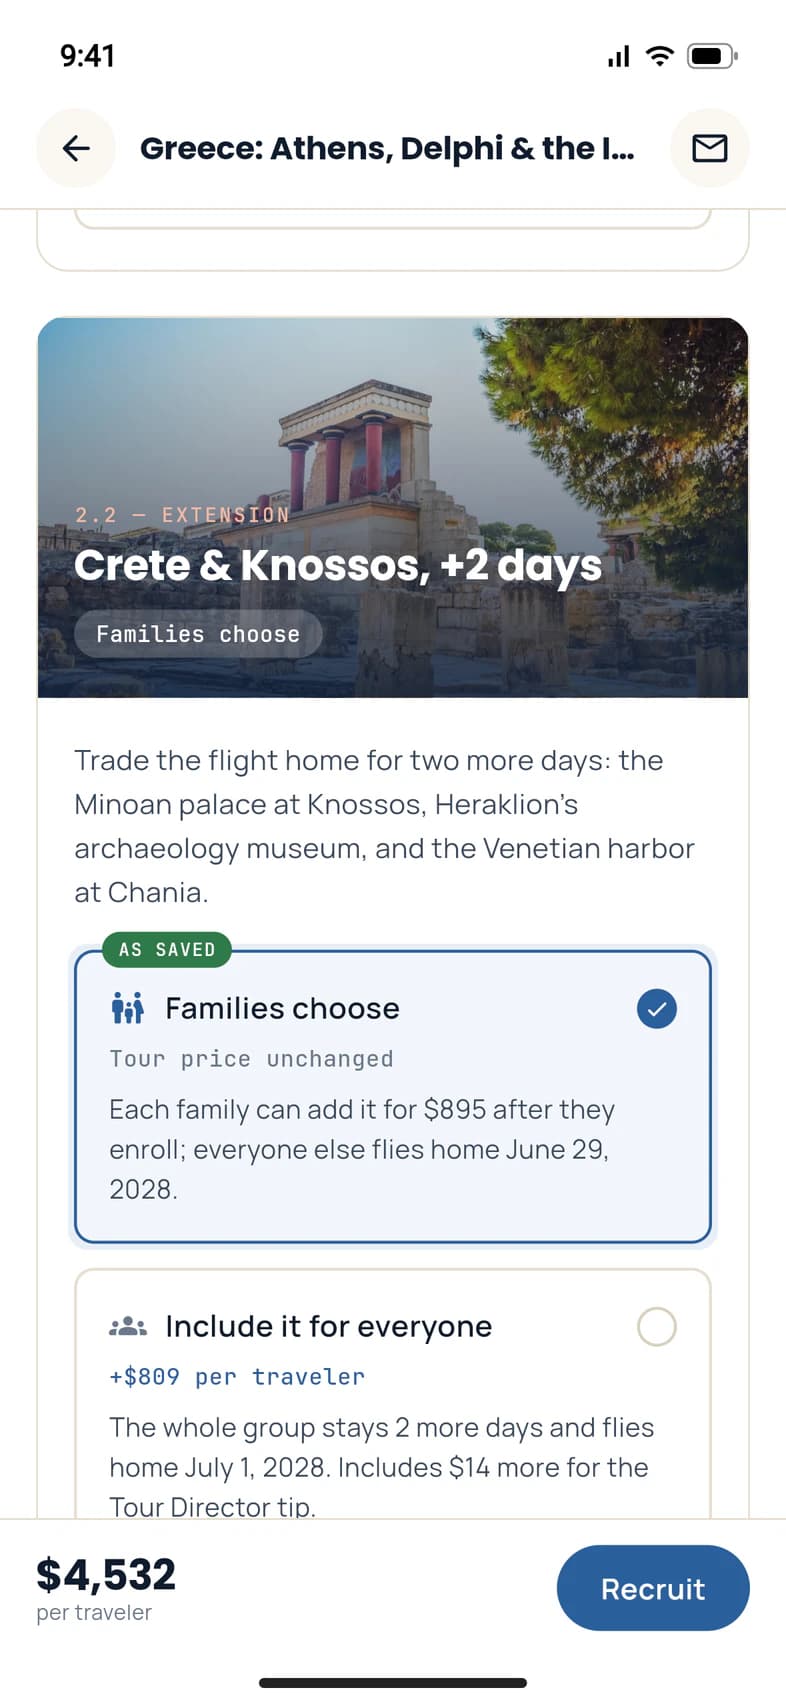
- Families choose 1: each family can add it after they enroll. Everyone else flies home on the tour's last day.
- Include it for everyone 2: the whole group stays, and its price is added for every traveler.
As saved marks what's on your tour now. Further down are two more choices:
- Double rooms for the whole group, when your proposal offers it: switch on Double rooms for everyone and every room becomes a double, two to a room, its price added for every traveler. Otherwise travelers are three to a room.
- Protect every traveler's tour: leave it at Families choose (each family picks a plan, or none, when they enroll), or pick Require Peace of Mind or Require Ultimate Peace of Mind. A required plan is added to each traveler's price, and families can't waive it.
- Step 5
Check your new price
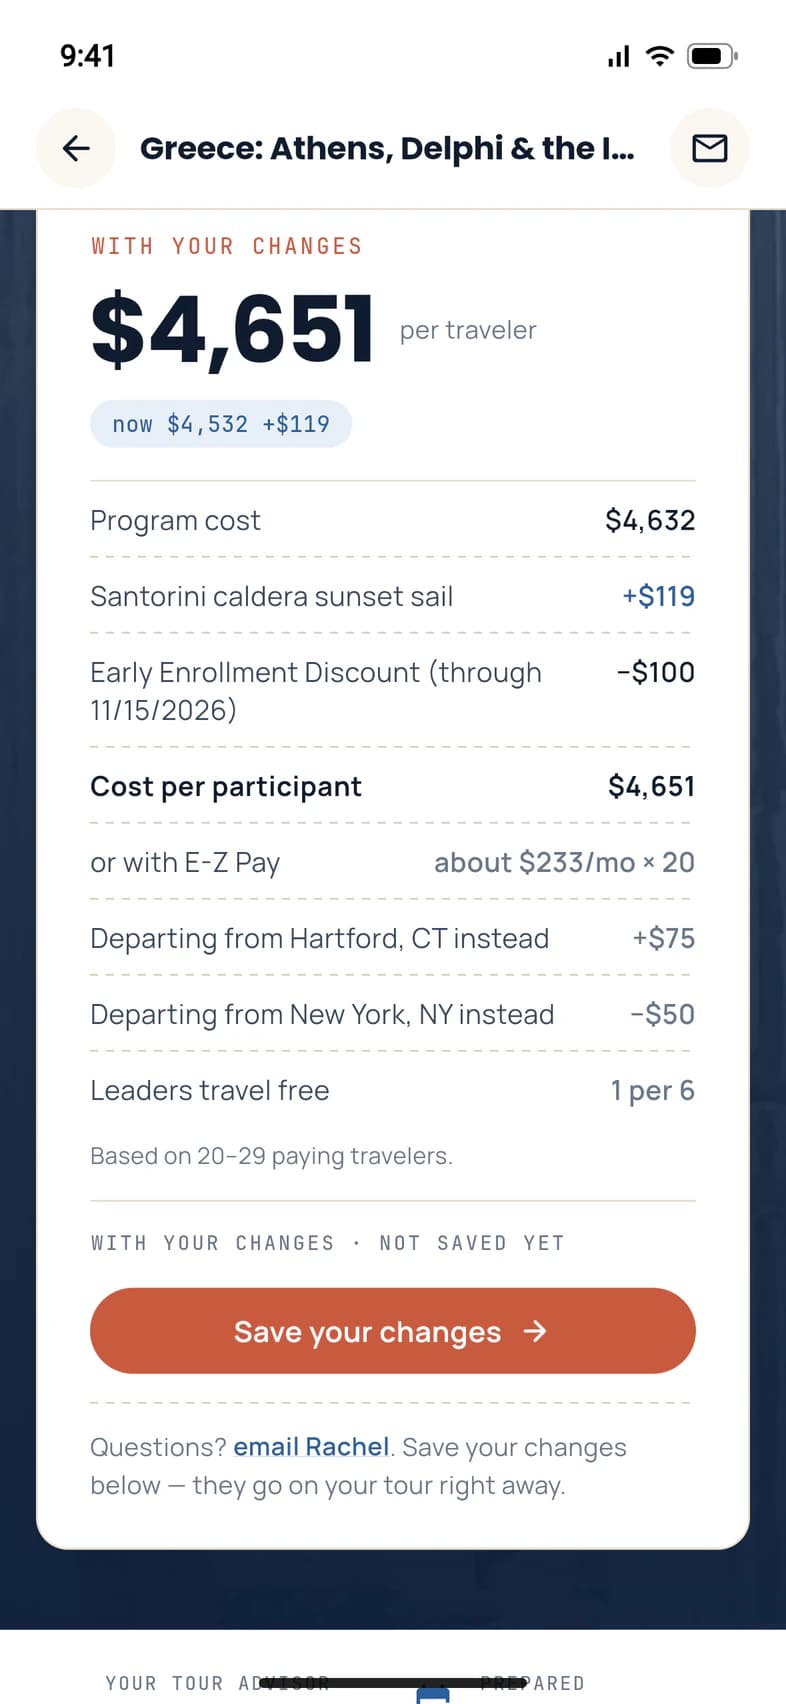
Scroll back to the top to see the whole price card. The big number 1 is the price per traveler, including a required protection plan if you chose one. The pill under it 2 shows what changed.
Below it, the price is worked out the way families see it on your enrollment page: Program cost, each choice you made 3, any discounts, then Cost per participant. Leaders travel free shows how many free spots your group earns. WITH YOUR CHANGES · NOT SAVED YET means your tour isn't changed until you save.
A question about the price, or a change that isn't on the page? Tap the envelope at the top of the page to email your Tour Advisor. It goes as a normal email, and the reply comes to the email you sign in with.
- Step 6
Set your Tour ID
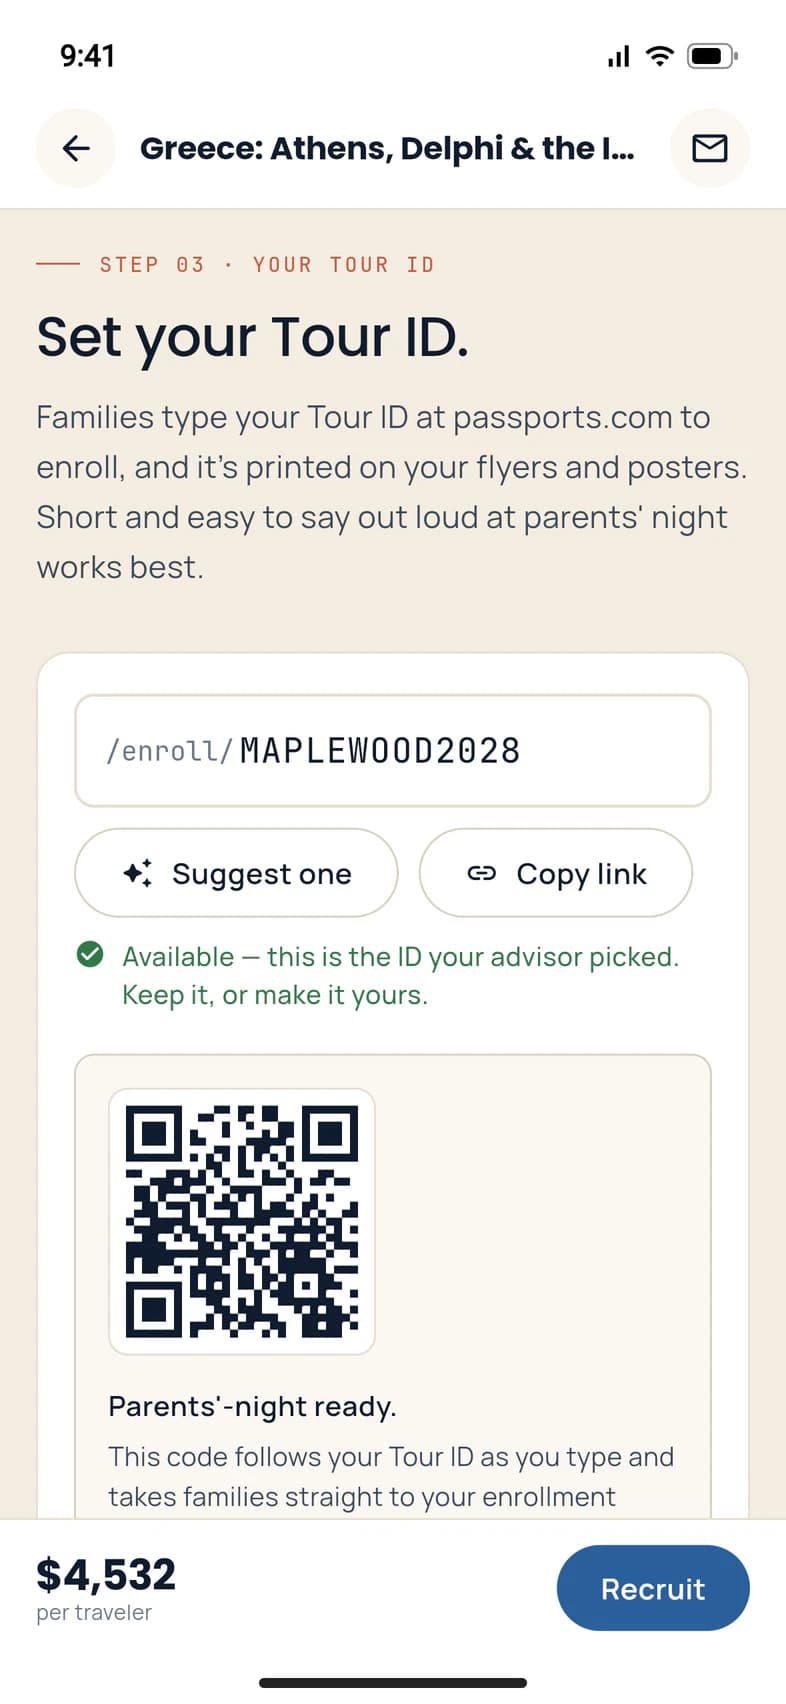
Step 03 is Set your Tour ID. Families type your Tour ID at passports.com to enroll, and it's printed on your flyers and posters.
Your advisor picked one 1. Keep it, or type your own: 4 to 20 letters, numbers or dashes. Suggest one offers ideas built from your school's initials, your last name, the country and the year.
The line under the buttons 2 checks that it's free. A new one says Available — it's yours when you save. The QR code below it follows your Tour ID and takes families straight to your enrollment page.
Saving a new Tour ID changes your enrollment link right away: a link or Tour ID you've already shared stops working. Once your advisor orders your flyers and posters, it's set.
- Step 7
Save your changes
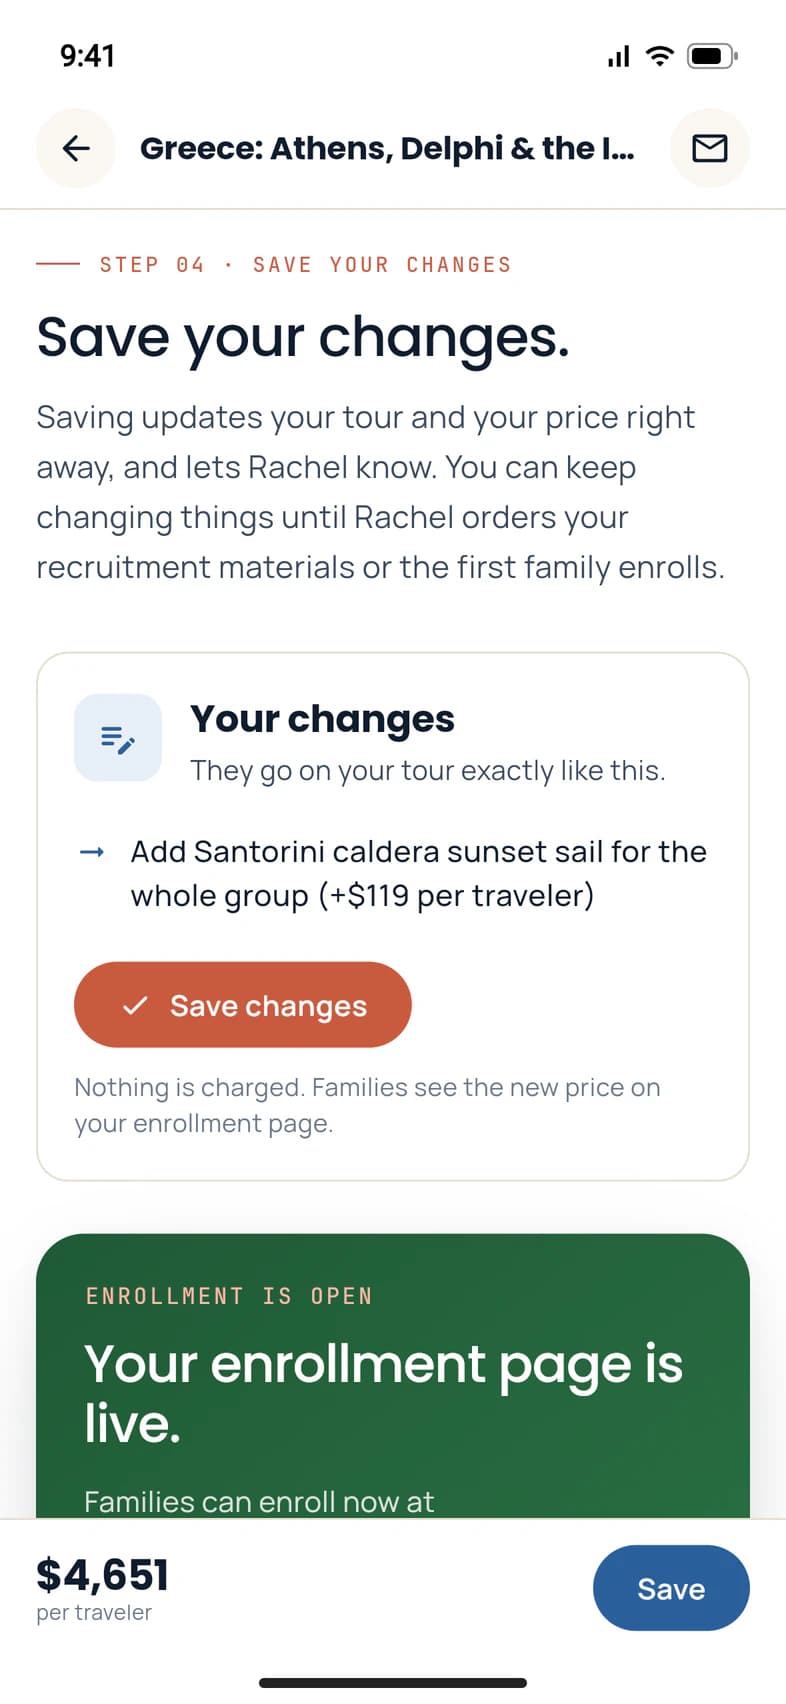
In Step 04, Your changes 1 lists exactly what goes on your tour. Tap Save changes 2.
Your changes are saved confirms it. Your tour, your price and your enrollment page update right away, and your Tour Advisor is told. You can come back and save again until your advisor orders your recruitment materials or the first family enrolls.
When it all looks right, tell your advisor: reply to their email, or tap the envelope at the top of the page. They order your flyers and posters with your Tour ID and QR code.
Save changes is greyed out until something changed. Nothing is charged to anyone: families see the new price on your enrollment page.
- Step 8
Compare several proposals
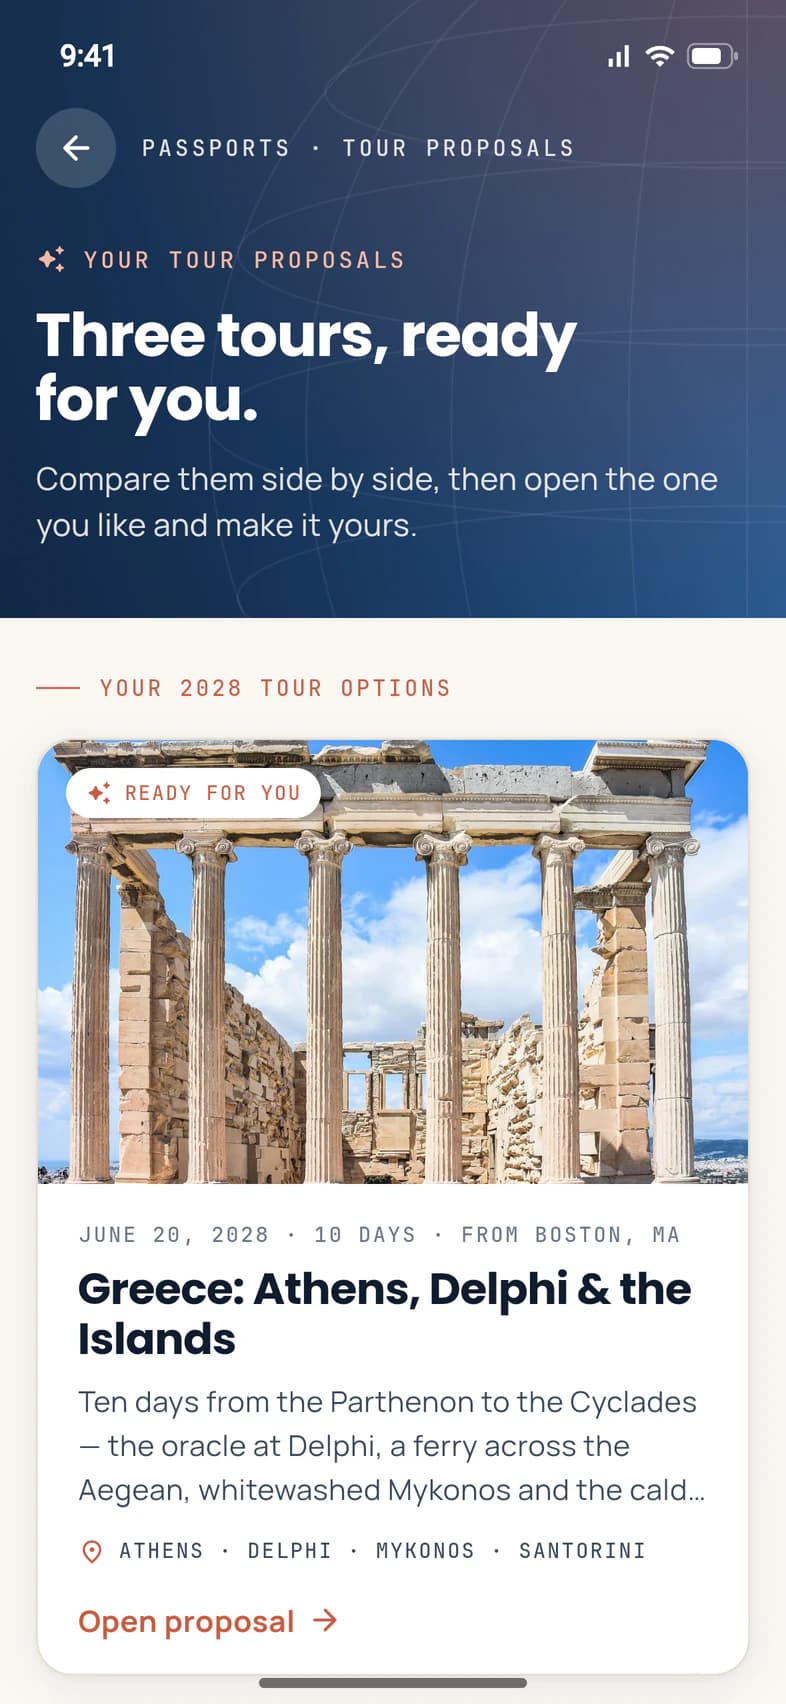
With two or more proposals, Home says You have 3 tour proposals. Tap See your proposals.
Your tour proposals shows them all, grouped by departure year 1. Each card says where it stands 2, for example Ready for you or You saved changes. Tap Open proposal 3 to make one yours.
At the top of each proposal page, Proposal 1 of 3 names the others: tap one to switch, or Compare all to come back here.
- Step 9
Ask for a change later
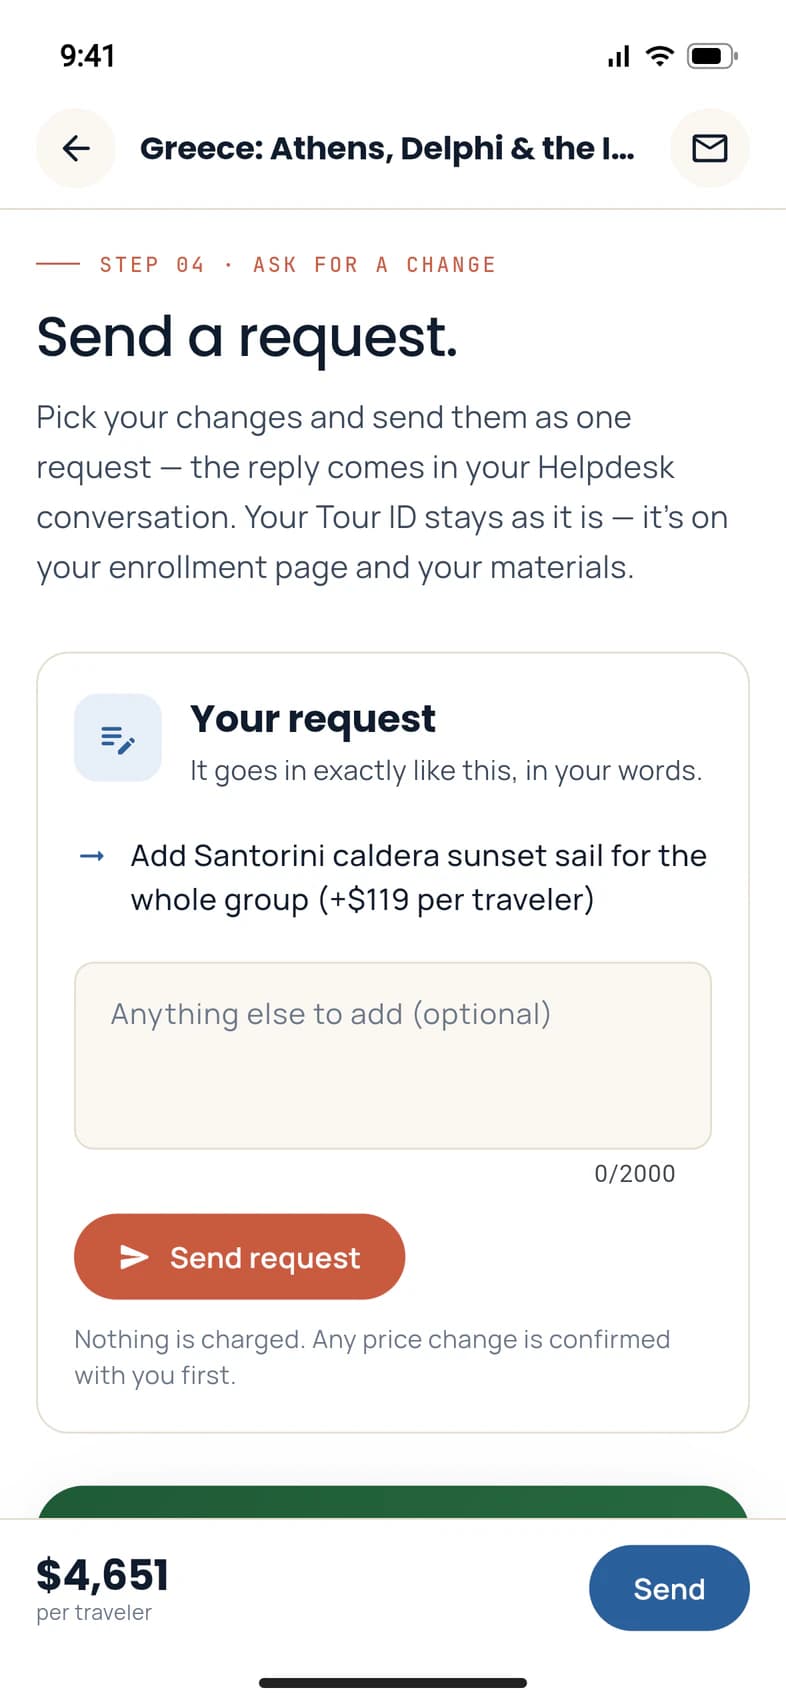
Once your recruitment materials are ordered, or the first family enrolls, changes go in as a request instead. Open the page from Admin › Tour proposal. Step 02 now says Want something different?
Switch on what you'd like, as before. Your price shows an estimate. Then, in Step 04, Send a request: check your changes 1, add anything else in the box under them, and tap Send request 2.
Request sent confirms it. The reply comes in your Helpdesk conversation: tap View to open it. Your Tour ID stays as it is.
Nothing changes on your tour until Passports makes the change, and any price change is confirmed with you first.
Good to know
Can families enroll while I'm still making changes?
If the top of the page says Enrollment open, yes: families can already enroll with your Tour ID, and each save updates their enrollment page right away. If it says Enrollment not open yet, your Tour Advisor opens enrollment once you tell them the tour looks right.
Does saving charge anyone?
No. Saving changes your tour and the price families see on your enrollment page. Nobody pays anything until they enroll.
Why can't I save any more?
Saving stops once your advisor orders your recruitment materials or the first family enrolls. After that, the same page sends your changes as a request (see the last step).
Can I change my Tour ID later?
Until your flyers and posters are ordered, yes, but the old link and Tour ID stop working the moment you save a new one, so share the new one. After the order, your Tour ID is set.
What if the Tour ID I want is taken?
The line under the field tells you another group already has it. Try adding your school or the year, or tap Suggest one for ideas.
My proposal says Review & approve.
Your Tour Advisor asked for your approval before enrollment opens. Make your choices and set your Tour ID the same way, agree to the Group Leader Terms & Conditions in Step 04, and tap Open enrollment (or Approve my tour). Questions? Email your Tour Advisor from the page, or call Passports at 1-800-332-7277.
Screens show a sample family and tour — your names, dates and amounts will differ. Checked against the app October 12, 2026.
Call us. A real person in Worcester picks up.
Monday to Friday, 8am to 4pm Eastern — and around the clock once your group is on tour. Or email passportsgo@passports.com.